The post How to Build Your Own Ecommerce Photography Studio: Step-by-Step Guide appeared first on Grasigner .
]]>So, what makes a buyer stop, look, and purchase a product? The answer is product photography.
High-quality product photos have the power to build trust, highlight details, and convince customers to make a purchase. That’s why many online sellers and photographers are investing in building their own eCommerce photography studio.
In this complete guide, we’ll explain step by step how you can build your own studio, no matter your budget or space.
Why is Ecommerce Photography So Important?
Before diving into the studio setup, let’s first understand why product photography is critical to eCommerce success.
- First impressions matter: Customers can’t touch or feel a product online. Photos are their only way to judge quality.
- Boosts trust and credibility: Clean, high-quality images make your brand look professional.
- Improves conversion rates: Better photos directly increase sales because customers feel more confident.
- Reduces returns: Accurate photos reduce misunderstandings and help buyers know exactly what they’re getting.
That’s why an eCommerce photography studio is not just “nice to have”—it’s a must-have for anyone serious about online sales.
What is an Ecommerce Photography Studio?
An eCommerce photography studio is a dedicated space designed for capturing professional product photos. It is different from an online store—this is the physical setup where photos are taken before they are uploaded online.
There are two main types of studios:
- Portable Studio – Small, foldable, and easy to set up anywhere. Ideal for photographers with limited space or those who work on the go.
- Fixed Studio – A permanent studio setup in a dedicated location. Perfect for long-term business growth.
Both options can deliver excellent results depending on your needs and budget.
Step-by-Step Guide to Build an Ecommerce Photography Studio
Let’s go step by step to make your studio setup smooth and professional.
Step 1: Plan Your Studio Layout
Before buying equipment, think about the overall design of your studio. Planning saves money and improves workflow.
Ask yourself:
- What kind of products will I shoot—small (jewellery, watches), medium (shoes, handbags), or large (furniture, appliances)?
- How much space do I have?
- Where will I place my lights, backdrops, and tripod?
- Do I need a waiting area or client meeting space?
- Will I use natural lighting, studio lighting, or both?
 Pro Tip: Sketch your layout on paper before setting up. This helps you visualise where everything should go.
Step 2: Set Your Budget
Once your layout is planned, the next step is to calculate the cost. You may already have a reasonable budget in place. If your budget allows, you can customise the entire space to match your needs. If not, choose smart, cost-saving options that keep your workflow efficient without major changes.
For example:
- Invest first in essential equipment and required furniture.
- Instead of painting the studio walls, use a portable backdrop in the shooting area.
- If space is limited, schedule one client at a time rather than managing multiple clients simultaneously.
- Delay purchasing non-essential décor items, such as indoor plants, that do not directly support your photoshoot work.
List all these expenses carefully and calculate the total. This process will help you set a realistic budget and understand your actual studio setup cost.
Step 3: Organize Your Workspace
At this stage, you should already have your essential equipment, furniture, and tools in place. Now it’s time to optimize your studio space for better workflow and efficiency.
Start by deciding how you will use the space. Identify areas for:
- Photoshoot room
- Post-production room
- Meeting room
- Waiting area
If you have separate rooms, that’s ideal. If not, you can use partition walls or dividers to create functional zones within the same space.
Next comes decoration and setup. Each area should include only the equipment and furniture needed for its purpose. The reference image below shows how to plan equipment placement (you can adjust it to your needs).
Source: Pinterest
No matter how you design the space, keep it clean and uncluttered. An organized studio improves focus, supports smooth work, and creates a professional environment for both you and your clients.
Step 4: Invest in the Right Gear
When it comes to photography gear, the cost can add up quickly. Commercial product photography equipment is often expensive, but quality tools are essential for professional results.
You may consider buying pre-owned gear at times. While this can help reduce initial costs, it should not be a long-term solution. A common saying applies here: equipment works best in the hands of its owner. When you own your gear, you understand its features, limitations, and performance, which makes your workflow faster and more reliable.
Photography gear includes many items. Below are the essential tools you should have before starting professional product photography.
I. Camera
Choosing the right camera for ecommerce product photography requires careful consideration. Before purchasing, evaluate the following points:
- Is it a recent or updated model?
- Does it deliver high image quality?
- Are the specifications suitable for product photography?
- Do the features match your shooting needs?
- Are compatible lenses easily available?
- Is the camera comfortable to hold and use?
- Does it fit within your budget?
Once these points align, read reviews and consult professionals to make a confident decision.
II. Lens
Selecting the right lens is just as important as choosing the camera. Your lens should be fully compatible with your camera and support your shooting style. Many camera brands offer recommended lens options, which can make the selection process easier.
When choosing a camera lens, consider the following factors:
- Size and dimension
- Focal length (fixed or zoom)
- Maximum aperture
- Field of view
- Autofocus speed
- Crop sensor or full-frame compatibility
- Image quality
- Magnification capability
- Price
These factors are especially helpful for first-time lens buyers.
III. Tripod
A tripod eliminates camera shake and motion blur, ensuring sharp and balanced images. Ecommerce product photography often requires consistent framing from a fixed position, especially for hero images on platforms like Amazon or eBay.
A tripod also allows you to shoot in low-light and long-exposure settings while maintaining stability. It creates a controlled and steady shooting environment.
IV. Cards and Batteries
Essential cards include gray cards, memory cards, SD cards, and CF cards. Always keep backups, as storage cards are small but critical. A faulty card can disrupt or ruin an entire photoshoot.
Store cards safely so they remain portable and protected. In addition, keep extra rechargeable batteries on hand. Battery failure during a shoot is common and easily avoidable with proper preparation.
V. Camera Cleaning Kits
Photography equipment is sensitive and easily collects dust and dirt. Poor maintenance can affect performance and cause long-term damage. Regular cleaning is essential to protect your camera body and lenses.
Camera cleaning kits are widely available online, including on platforms like Amazon. Having the right tools makes cleaning simple and stress-free whenever needed.
Step 5: Set Up Backdrops

You need studio backdrops for every photography session. A quality backdrop plays a major role in enhancing the final image, helping the product stand out clearly. For this reason, it is recommended to have multiple backdrop options instead of relying on just one.
Today, photography backdrops are widely available through eCommerce stores and local photography shops, making it easy to find attractive and suitable options for different shooting needs.
There are many types of backdrops available. Some of the most commonly used studio backdrops include:
- Fabric
- Canvas
- Chroma key
- Collapsible
- Floor drops
Use a background stand to hang the backdrop in your shooting area, and your setup will be ready for product photography.
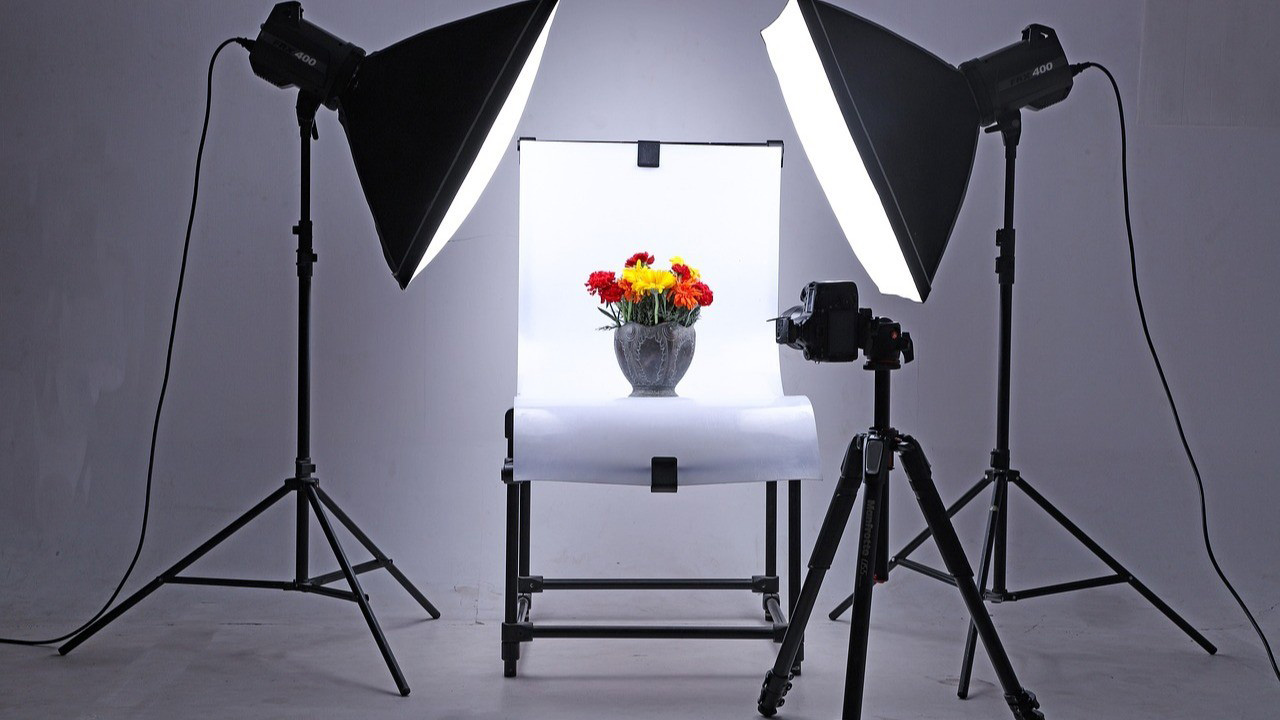
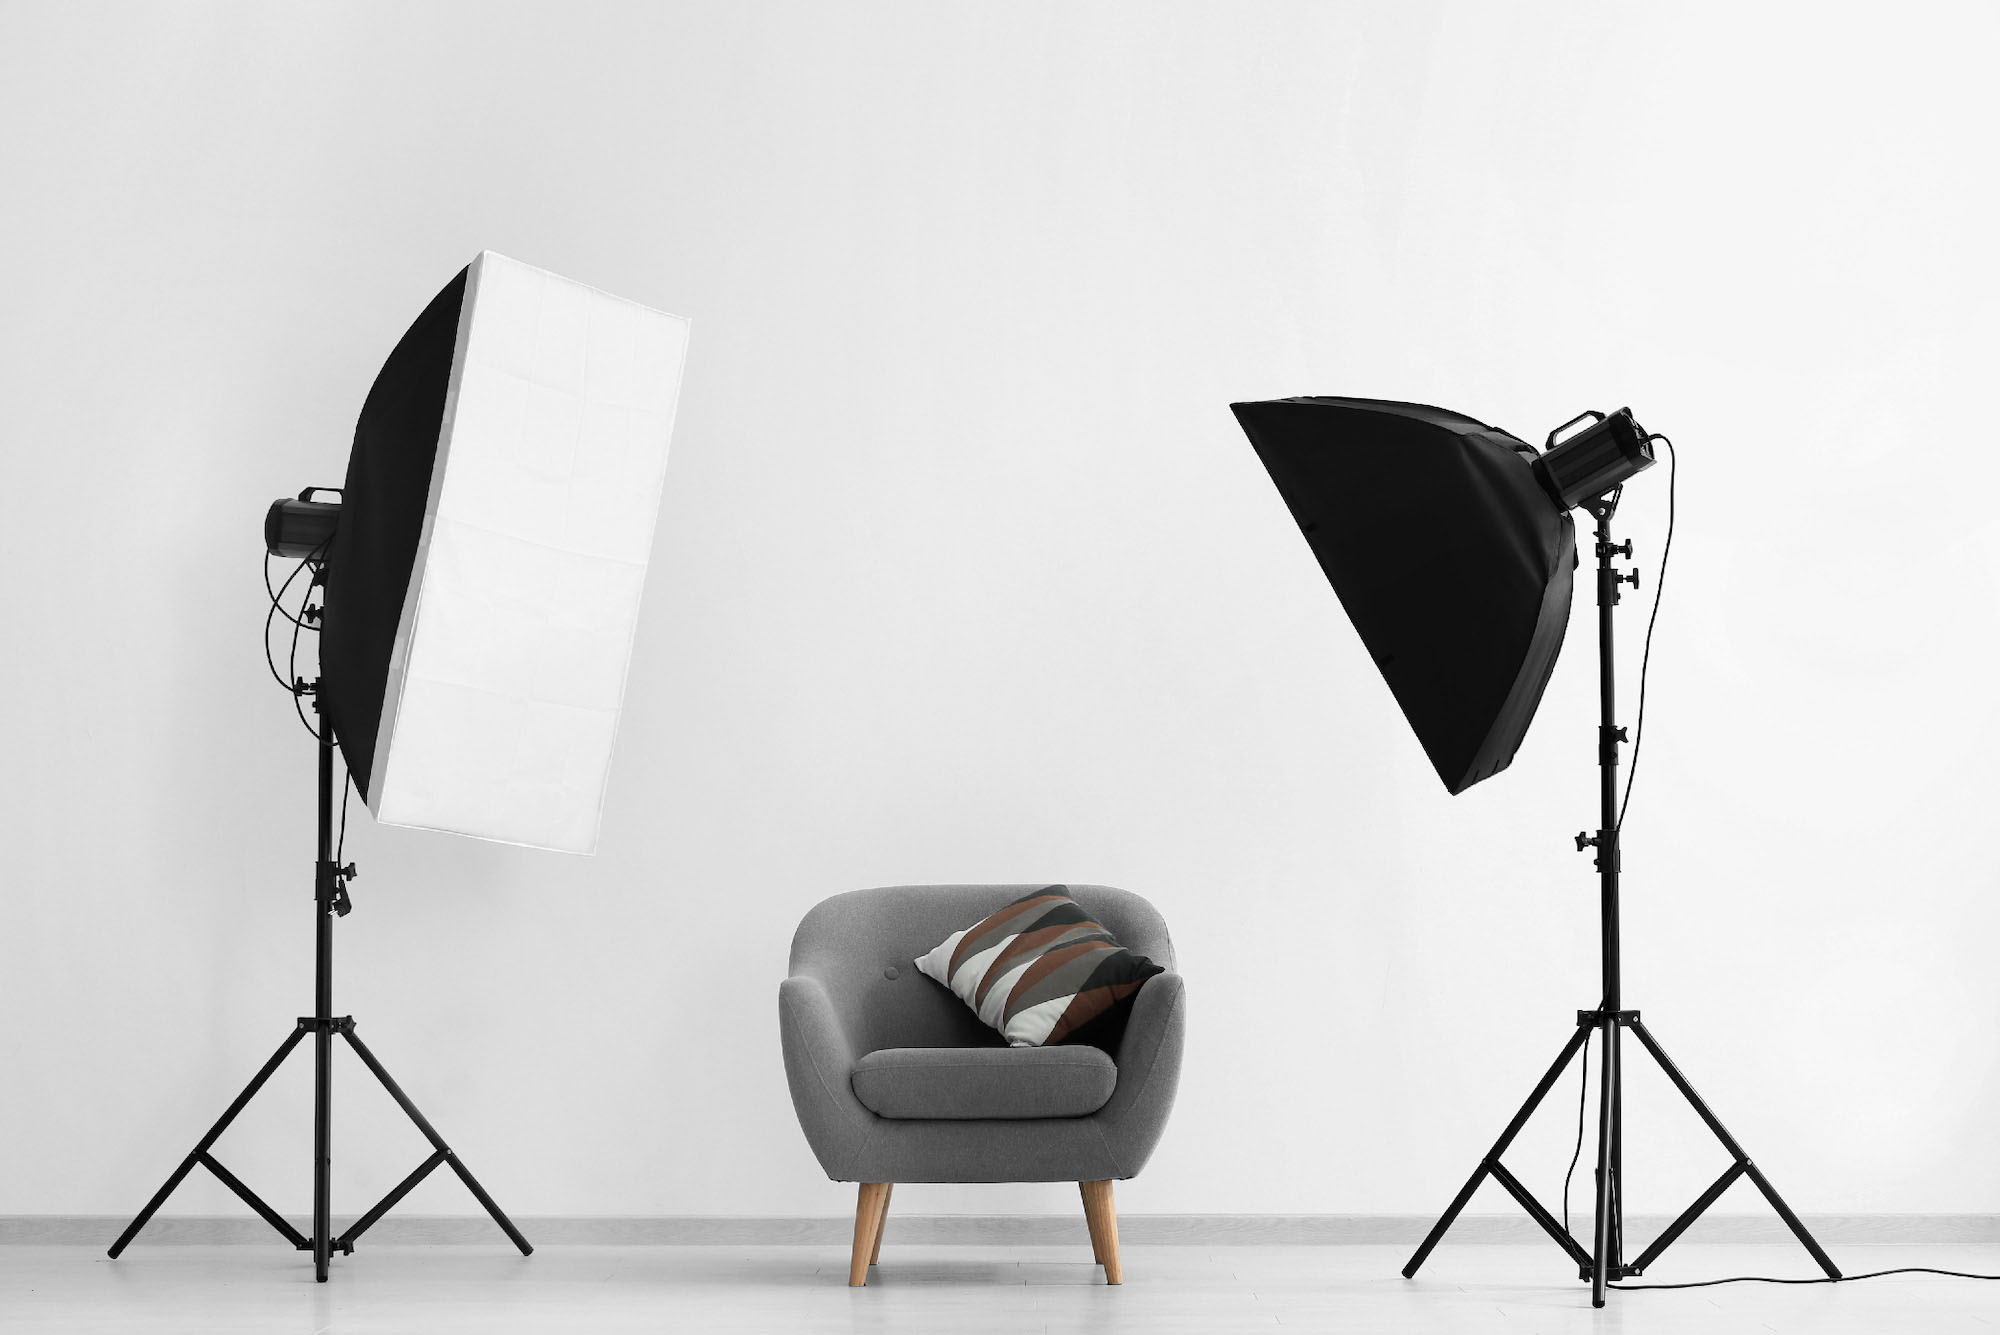
Step 6: Install Lighting Equipment
Lighting plays a critical role in photography and is essential for achieving commercial-quality results. Proper lighting highlights a product’s appearance, shape, texture, and size while delivering a clear visual message. Always ensure there is enough light reaching your photography setup.
There are two main types of light sources:
- Natural light
- Artificial light
Natural Light
Sunlight is the most powerful and cost-free lighting source available. You can use it effectively for product photography, especially during soft daylight hours. Avoid shooting when the sunlight is too harsh, as it can create strong shadows and uneven exposure. Aside from that, natural light allows you to shoot comfortably throughout the day.
However, natural light is inconsistent and unavailable at night. This limitation makes artificial lighting necessary for professional work.
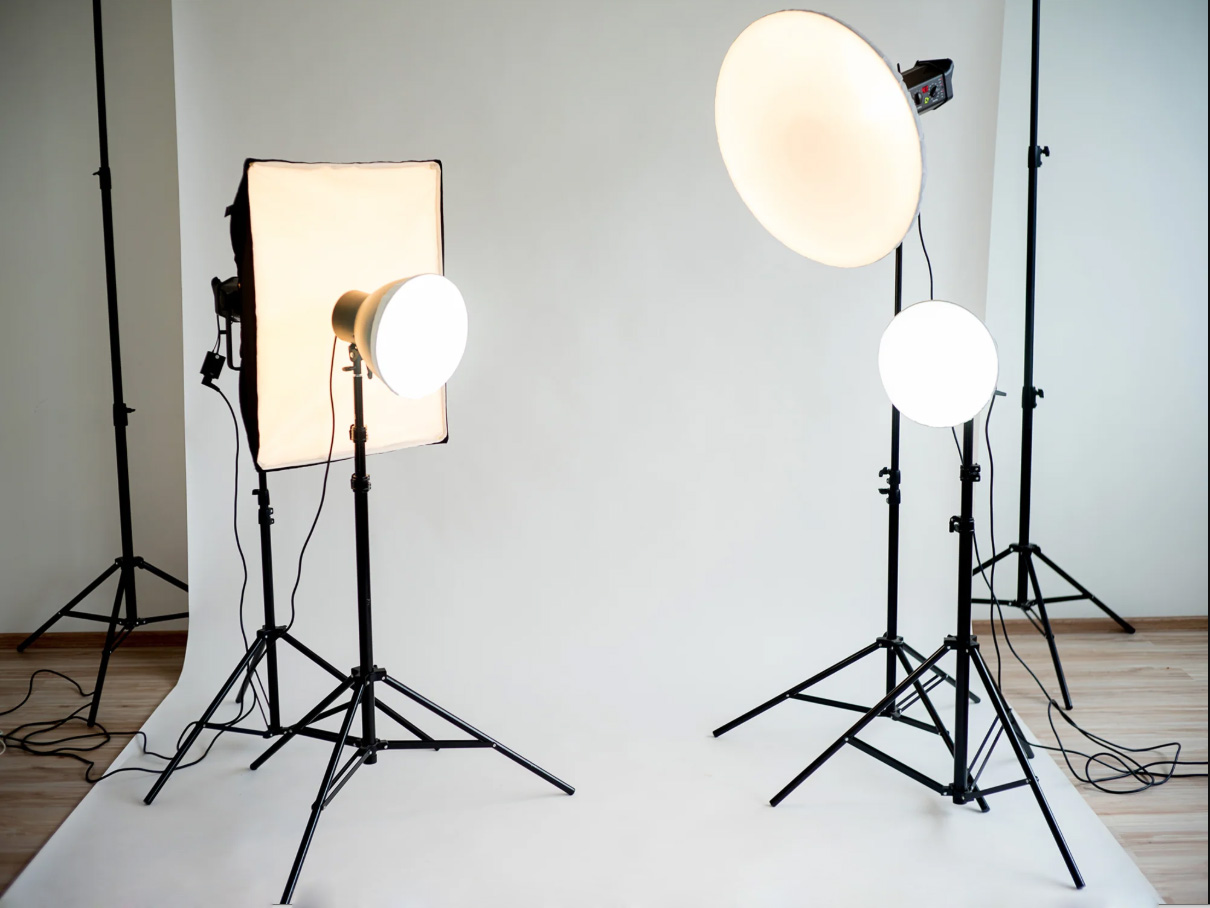
Artificial Light
There are many studio lighting options designed for product photography. To properly light a studio, photographers commonly use the following tools:
- Strobe light: Produces short, powerful flashes of light
- Fluorescent light: Helps illuminate larger areas evenly
- LED light: Provides continuous and adjustable lighting
- Softboxes: Available in square, rectangular, or octagonal shapes for soft light
- Light modifiers: Accessories like umbrellas and diffusers that control light direction
- Reflectors: Bounce light to brighten shadowed areas
Using the right lighting setup ensures clear, consistent, and professional product images for ecommerce and commercial use.
How to Make Your Studio Brighter
The most effective solution is using the three-point lighting technique.
Three-point lighting uses three separate light sources placed at different angles to evenly light the subject, as shown in the example below. This method is widely used in commercial photography to reduce harsh shadows and prevent uneven lighting.
i. Key Light
The key light is the primary light source in any setup. It provides the main illumination and lights up most of the subject. This light is essential and cannot be skipped. All other lights support the key light to achieve balanced, professional results.
ii. Fill Light
The fill light works alongside the key light to soften shadows and reduce contrast. It brightens darker areas without removing all shadows. For a natural look, the fill light should be slightly less intense than the key light.
iii. Back Light
The backlight, also known as a rim light or a hair light, is placed behind the subject. It separates the subject from the background, adding depth. This light is especially useful for larger products or subjects placed away from the background, preventing the back side from looking dark.
Step 7: Use a Tabletop Studio Kit
For small products like watches, jewelry, or cosmetics, a tabletop kit is a smart choice. These kits include a light tent and built-in lighting, allowing you to capture clear and shadow-free images even in small spaces.
Step 8: Choose the Right Editing Software
Unless clients specifically request them, you should not deliver raw, unprocessed images. Even light photo editing can significantly improve a photo’s overall look and quality. Many photographers specialize in using professional photo editing tools to enhance their images.
If you plan to edit photos yourself, choose industry-standard software such as Adobe Lightroom or Photoshop. While handling editing in-house may seem like a smart choice at first, it can add to the workload for photographers with busy schedules.
For this reason, many professionals outsource photo editing services to reduce costs and save valuable time.
To achieve premium-quality, creative results, hiring a reliable clipping path service provider is highly recommended.
Additional Tips for Building a Successful Studio
1. Practice and Experiment
Don’t expect perfection on day one. Keep experimenting with lighting, angles, and backdrops until you find what works best.
2. Stay Organized
Label your equipment, keep cables tidy, and create a system for storing photos. A professional workflow saves time and impresses clients.
3. Offer Multiple Services
Don’t just stop at product photography. Offer related services like:
- Lifestyle product shoots
- 360-degree photography
- Product videos
- Post-production editing
This makes your studio more valuable to clients.
4. Keep Learning
The world of photography is always evolving. Stay up to date on new techniques, tools, and trends to stay ahead of competitors.
Final Thoughts
An eCommerce photography studio is more than a workspace—it’s a strategic asset that shapes how customers perceive your brand. When your setup, lighting, and workflow align with professional standards, every image tells a clear, confident story about your product. You don’t need a massive budget or a large space to succeed; what matters most is thoughtful planning, consistent quality, and a commitment to improvement. As eCommerce continues to grow, a well-built photography studio will help you stand out, build trust, and turn product views into real sales.
With dedication and consistency, your studio can become a trusted name in the eCommerce industry. Every effort you put in takes you one step closer to success.
The post How to Build Your Own Ecommerce Photography Studio: Step-by-Step Guide appeared first on Grasigner .
]]>The post The Ultimate Guide to Professional Ghost Mannequin Photo Editing Services appeared first on Grasigner .
]]>What is Ghost Mannequin?
Why Ghost Mannequin Editing Matters in eCommerce

With online shopping becoming the norm, customers can’t physically touch or try products. That’s why product images must do the selling. Ghost mannequin images provide:
- Professional look – A polished and consistent appearance for product catalogs.
- Better shopping experience – Customers see the true fit and design without distractions.
- Brand consistency – Clothing looks uniform across platforms and sales channels.
- Increased sales – Clear, attractive visuals influence buyer decisions.
Whether you run a small boutique or a large fashion brand, ghost mannequin services can transform the way customers view your products.
Understanding Ghost Mannequin Services
Understanding Ghost Mannequin Services explains how this professional image-editing technique enhances e-commerce product photos. It focuses on removing mannequins or models while keeping the garment’s natural shape, fit, and details. This service helps create clean, consistent, and high-quality images that attract buyers, build brand trust, and increase online sales.
How To Apply the Ghost Mannequin Effect
Professional ghost mannequin photo editing services usually include:
1. Preparation of the Product
5. Image Resizing and Optimization
Image Resizing and Optimization ensures your product photos meet the exact size and quality requirements of eCommerce platforms like Amazon, Shopify, eBay, and Etsy. This process adjusts image dimensions, resolution, and file size to ensure fast loading without sacrificing clarity. Proper optimization improves image appearance, boosts page speed, and helps your products look professional, consistent, and ready to sell across all online marketplaces.
This ensures that every product image looks flawless and is ready to grab customer attention.
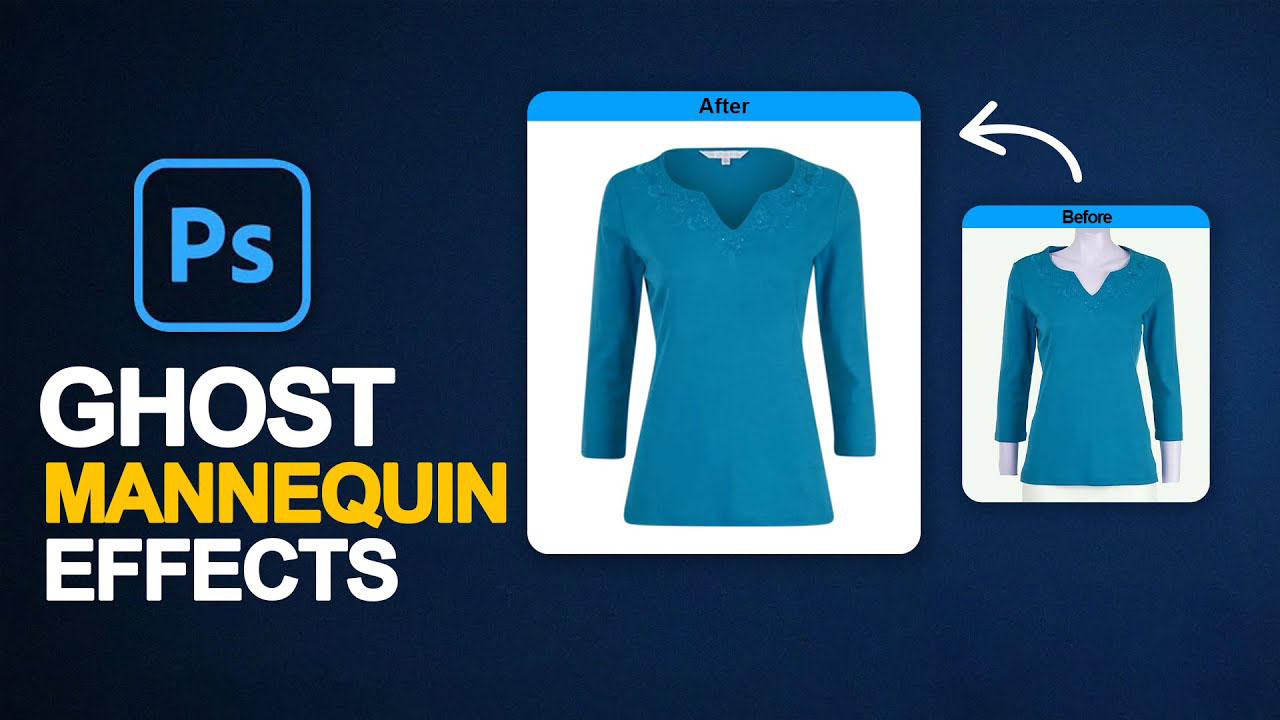
The Ghost Mannequin Effect Explained
The ghost mannequin effect creates the illusion that clothing is floating or being worn, without showing a mannequin or human model. For example, a t-shirt shot on a mannequin can be edited by removing the mannequin and merging the neckline or collar from another shot. This gives a complete, 3D-like shape.
This technique is widely used in:
- Apparel photography – T-shirts, shirts, jackets, pants, skirts, and dresses.
- Sportswear and activewear – Gym outfits, leggings, and swimwear.
- Accessories – Scarves, hats, and even some footwear.
The ghost mannequin effect highlights every detail of stitching, fabric, and fit—just like customers expect when shopping online.
Benefits of Ghost Mannequin Services for Businesses
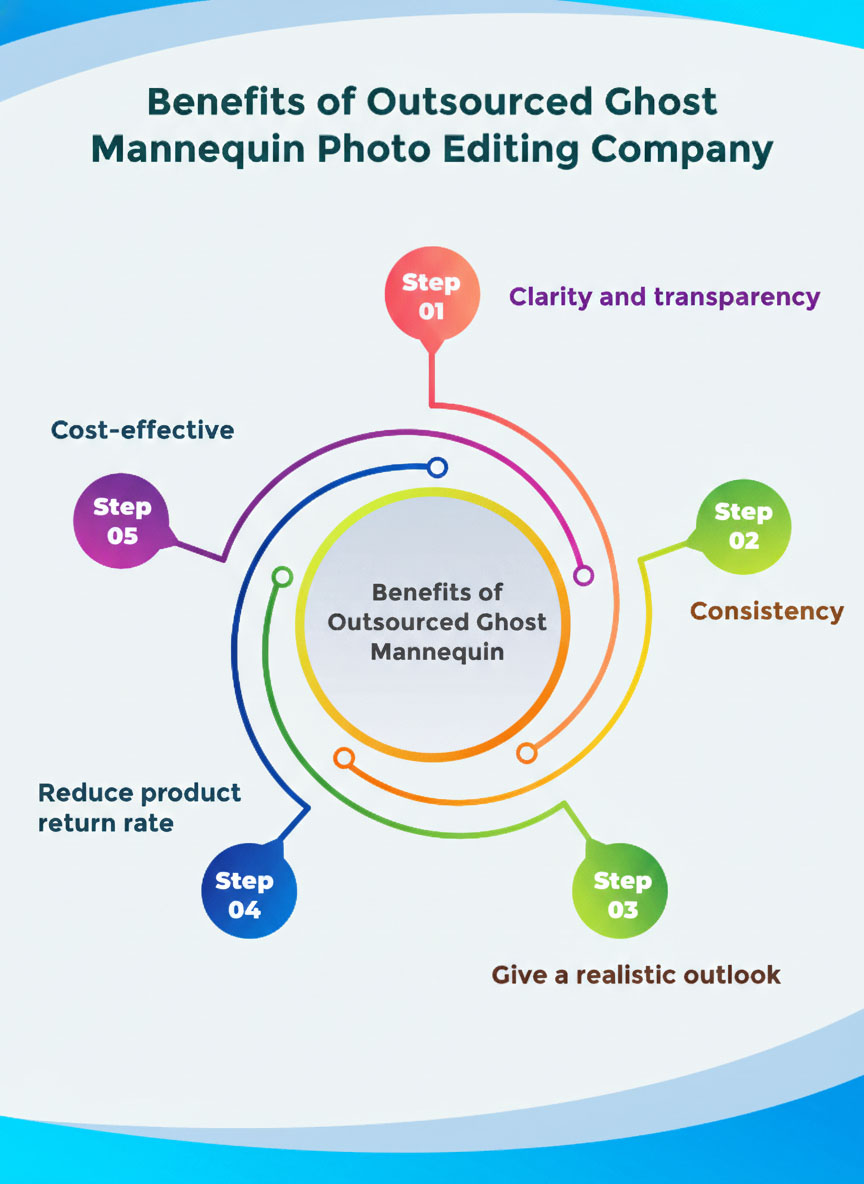
1. Professional Presentation
2. Cost-Effective Solution
3. Time-Saving
4. Increased Conversions
5. Multi-Platform Ready
Industries That Rely on Ghost Mannequin Services
While ghost mannequin editing is most popular in fashion, it benefits many industries:
- Clothing & Apparel Brands – From startups to luxury fashion houses.
- Sportswear & Fitness Gear – Clear display of technical fabrics and designs.
- E-commerce Retailers – Professional catalogs that attract customers.
- Photography Studios – Outsourcing editing saves time and ensures quality.
- Manufacturers & Wholesalers – Clean product photos for B2B clients.
Ghost Mannequin vs. Other Editing Styles
Many businesses wonder—why not just use flat-lay photography or live models? Here’s how ghost mannequin compares:
- Flat Lay – Flat Lay photography offers a clean and straightforward view of products, but it often lacks depth and a realistic 3D appearance, making items appear less dynamic in eCommerce listings.
- Model Photography – Model photography provides a lifelike, compelling presentation of products; however, it often comes at a high cost and can lead to inconsistent image quality across your online store.
- Ghost Mannequin Effect – The Ghost Mannequin Effect offers a cost-effective solution for creating professional, polished product images, ensuring consistency and a uniform look across large eCommerce catalogs.
For e-commerce, the ghost mannequin is the perfect balance between quality and affordability.
Choosing the Right Ghost Mannequin Photo Editing Services
Not all editing providers are the same. When selecting a ghost mannequin service, look for:
- Extensive expertise in professional apparel photo editing, delivering high-quality, polished, and accurate product images. Skilled in enhancing garment details, maintaining consistency across catalogs, and optimizing visuals for eCommerce platforms to boost brand appeal and online sales.
- Reviewing portfolio samples is essential to evaluating the quality and consistency of apparel photo editing services. High-quality portfolios demonstrate attention to detail, expertise in ghost mannequin techniques, and the ability to produce professional, eCommerce-ready product images.
- Efficient turnaround for bulk image editing keeps your eCommerce store up to date without delays. Professional services deliver large volumes of high-quality, ghost mannequin or apparel images quickly, maintaining consistency, accuracy, and readiness for online marketplaces.
- Cost-effective pricing tailored to your business needs ensures professional photo editing for your apparel without exceeding your budget. Services provide high-quality, ghost mannequin and eCommerce-ready images that deliver value, maintain consistency, and support your online store’s growth.
- Reliable customer support ensures timely assistance for revisions, urgent requests, or special editing needs. Professional services provide clear communication, quick solutions, and personalized guidance to guarantee high-quality ghost mannequin and apparel images that meet your business expectations.
A reliable ghost mannequin service can become your long-term partner in scaling your online business.
Tips for Better Ghost Mannequin Photography Before Editing
To get the best results from ghost mannequin photo editing services, start with high-quality photography:
- Use consistent lighting to avoid harsh shadows.
- Shoot on a neutral background for easy editing.
- Capture multiple angles (front, back, close-ups).
- Ensure clothes are ironed and fit well on the mannequin.
- Take extra shots of collars, sleeves, and inner labels for merging.
Better photos mean faster editing and more professional results.
Ghost Mannequin Services for Online Marketplaces
Every marketplace has strict photo guidelines. With ghost mannequin images, your products will easily meet these standards.
- Amazon – White background, professional look, no distractions.
- Shopify – Clean, high-resolution images for eCommerce stores.
- eBay & Etsy – Uniform product images that stand out in search results.
Professional ghost mannequin editing ensures your clothing meets requirements and stands out in a competitive market.
The Future of Ghost Mannequin Editing
As AI and automation improve, some businesses experiment with AI-based editing. However, manual ghost mannequin photo editing services still provide the highest quality because human editors ensure natural looks, attention to detail, and brand consistency.
The demand for ghost mannequin photography service will continue to rise as more businesses move online and customers expect professional-quality visuals.
Why Your Business Needs Ghost Mannequin Editing
In today’s competitive eCommerce world, your product photos are your first impression. Ghost mannequin services help brands create professional, consistent, and attractive product catalogs that convert visitors into buyers.
By investing in professional ghost mannequin photo editing services, you:
- Save money compared to hiring live models.
- Build a strong brand identity with consistent visuals.
- Increase sales with clean, distraction-free product images.
Ghost Mannequin Effect On Post Production FAQ
What is an invisible mannequin?
Why use a ghost mannequin?
How to post clothes without a mannequin in Photoshop?
How do you photograph clothes with invisible mannequins in Photoshop?
How do I choose the best provider for my needs?
When choosing a service provider, prioritize those with a strong portfolio, positive client reviews, and experience in your type of apparel. Request a sample of work and clearly outline your requirements to ensure they deliver high-quality, professional, and eCommerce-ready images.
How to photograph clothes on a mannequin?
- Dress the mannequin neatly, ensuring the garment is wrinkle-free and properly arranged.
- Use bright, even lighting to capture clear and detailed images.
- Position the mannequin to highlight the fit, style, and key features of the clothing.
- Use a high-quality camera or smartphone for sharp, professional photos.
- Edit the images to enhance colors, remove imperfections, and create polished, eCommerce-ready visuals.
Final Thought
In the competitive world of eCommerce, high-quality product images are no longer optional—they are essential. The ghost mannequin effect offers businesses the perfect balance of professionalism, consistency, and cost-effectiveness, helping clothing and apparel brands showcase products in the best possible way. From enhancing visual appeal to meeting strict marketplace requirements, this technique drives better customer engagement and higher sales.
At Grasigner, we specialize in professional ghost mannequin photo editing services that transform ordinary mannequin shots into polished, 3D-like product images. Our experienced team ensures every image highlights the garment’s details, maintains brand consistency, and is fully optimized for platforms like Amazon, Shopify, eBay, and Etsy. By choosing Grasigner, businesses gain a reliable partner dedicated to elevating their online presence, saving time and cost while delivering visually stunning results that convert browsers into buyers.
The post The Ultimate Guide to Professional Ghost Mannequin Photo Editing Services appeared first on Grasigner .
]]>The post Amazon Product Image Size Requirements – The Ultimate Guide in 2026 appeared first on Grasigner .
]]>Our research shows that image requirements are a frequent cause of listing problems. Amazon uses automated systems to review images during the upload process. To ensure approval, product images must fully comply with Amazon’s listing guidelines from the outset.
Why Do Amazon Product Image Size Requirements Matter?
Images play a vital role in successfully listing products on Amazon. That’s why Amazon’s image guidelines emphasize photo quality. Every seller must follow these standards to ensure their listings meet platform requirements. Using high-quality images in the correct size and aspect ratio, with a clean, professional appearance, alongside a clear product description, can make the listing process smoother and more effective.
In addition, it offers several other long-term benefits that can add lasting value to your business.
Increase Conversion Rate
High-quality images play a key role in attracting buyers. They make your product stand out and increase visibility. However, not all photos are perfect; this is where professional editing becomes essential.
Get top-quality image clipping path service from us, pricing starts at just $0.29!
For Search Engine Optimization
Following Amazon’s image size requirements can greatly improve your search engine optimization. When your images have the right size, format, shape, and color, your products are more likely to rank higher in search results, leading to increased visibility and more traffic to your listings.
Product Comparison
Photos are essential on competitive platforms like Amazon. That’s why Amazon’s photo requirements are designed to simplify the process for sellers. Meeting these standards not only helps attract customers but also gives you a competitive edge when comparing your product with similar brands and models.
Drive Traffic to Website:
To drive more traffic to your site, it’s important to focus on image file size during optimization. Properly sized images improve user experience, keeping viewers engaged on your product page and guiding them toward your website. When done right, this also helps boost your visibility on Amazon.
Images Tell Stories
A common saying is, “A good product is shown through good images.” When your main image is clear and supported by additional views, such as angle shots, infographics, lifestyle photos, or videos, you showcase professionalism and communicate your brand’s message. Together, these elements influence and inspire customers to make a purchase.
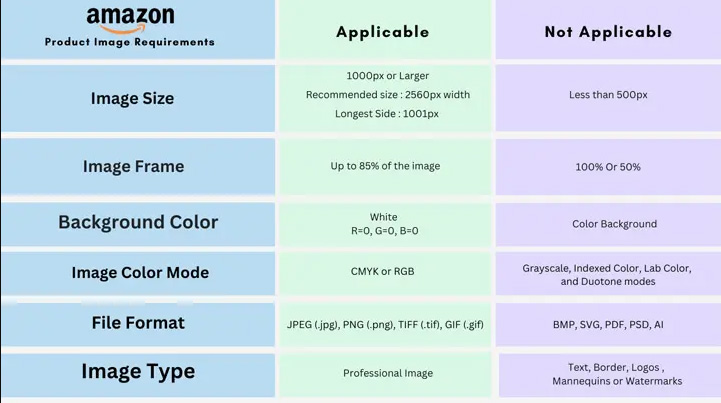
What are the image requirements for Amazon?
Amazon has set specific guidelines for images uploaded to its platform, and it is essential for all sellers to adhere to these requirements.
General Requirements For All Images
- Product images must be in full color, not black-and-white.
- The image should accurately represent the product and match the product title.
- The product should cover at least 85% of the frame.
- The image must showcase a clear, frontal view of the product.
- Images must be at least 1600 pixels on the longest side to enable zoom. This allows online shoppers to hover over your image and see a close-up view of the product through a magnifying lens.
- If the main image features a model, their posture should be upright, avoiding seated, kneeling, or other non-standing positions. This guideline does not apply to assistive technologies, such as prosthetics.
Image File Name
The file should be named on Amazon as follows:
Product identifier
Product identifiers should not contain special characters such as dashes or underscores, as these may cause upload issues. Accepted product identifiers include:
- ASINs (Amazon Standard Identification Number)
- ISBN-13 (International Standard Book Number)
- UPC (Universal Product Code)
- EAN (European Article Number)
- JAN (Japanese Article Number)
- 4 character variant (Optional)
To upload additional product images, sellers must include a 4-character variant code in the image file name. This code specifies the type of image being uploaded. Here’s a list of this-
File extension
The file extension indicates the file type, such as .jpg or .jpeg. However, the file type and image type are distinct. For example, you can change a .jpg interior shot to a .tiff interior shot, altering the file type but not the image type.
- Each separate element should be divided by a period.
Amazon Logo, Trademark & Badges
Product images submitted by sellers must not feature logos, trademarks, or any variations or imitations of Amazon, Alexa, Prime, or the Amazon Smile design. This also includes badges like-
- Amazon’s Choice
- Premium Choice
- Amazon Alexa
- Works with Amazon Alexa
- Best Seller
- Top Seller, etc.
Amazon Product Image Categories
Amazon requires various types of images for product listings. To make things easier, I have organized each image type separately for your convenience. Let’s explore the requirements for each one.
1. Amazon Main Image Requirements
When a shopper searches for a product on Amazon, the first image they see is the main, or hero, image. It appears not only in search results but also on the browse and product detail pages.
The item shown in the hero image is the parent product. When capturing this image, sellers must be careful, as Amazon has specific guidelines in place to ensure quality and consistency. Take a look at Amazon’s hero image requirements-
- The image must be a professional photograph of the actual product.
- Only one product should be clearly in focus.
- The product must be fully visible within the image frame.
- The background must be pure white (RGB 255, 255, 255).
Prohibition
- Graphics, drawings, illustrations, or placeholders cannot be used as the main image.
- Text, borders, inset images, color blocks, logos, or watermarks are not allowed.
- Main images must not show partial shots or multiple angles of the product.
- Products must not touch the frame edges or appear cut off.
- Items inside packaging (boxes, bags, etc.) are not allowed unless the packaging highlights key features.
- Animated .gif files are not permitted.
- Blurry or pixelated images will be rejected.
- Brand logos or promotional text cannot appear in the image.
- Offensive or inappropriate content is strictly prohibited.
2. Amazon Additional/Supporting Image Requirements
Amazon allows sellers to upload up to nine product images, with seven typically displayed on the product listing page. Aside from the main image, the remaining ones are known as additional or non-primary images. These images, sometimes called variants, help showcase product features such as details, materials, styles, and other important aspects.
3. Amazon Swatch Image Requirement
Swatch images are small thumbnail visuals that appear next to the main image on a product detail page. These images, often referred to as ‘child’ variations, represent different options of the main product, such as colors, patterns, or styles, offering customers a quick view of available choices.
- Resolution: Swatch images should be 72 pixels per inch (ppi) for optimal clarity on the product detail page.
- Size: Each image must be at least 30 pixels on its longest side to ensure visibility.
- File Format: The recommended file format for swatch images is JPEG (.jpg) for best compatibility and performance.
4. Amazon Product Video
Amazon now allows product videos to be displayed directly on the product detail page, alongside additional images. These videos make it easier to showcase key features and give customers a clearer understanding of the product in use.
Here are the requirements for uploading videos:
- Eligibility: Video uploads are available exclusively for brands registered through the Amazon Brand Registry Program.
- Acceptable Formats: Supported video formats include .mov and .mp4.
- Video Quality: Sellers are encouraged to upload videos in high definition (up to 1080p) for an optimal viewing experience.
- File Size: The maximum allowed video file size is 5GB.
- Thumbnail Image: A thumbnail is automatically generated for each video. To customize it, a high-quality .jpg or .png file must be uploaded.
Prohibited Content:
- Videos cannot contain links, URLs, or calls to action (CTAs).
- Uploaded videos cannot be edited once live. Any changes require re-uploading a new video.
- Bulk video uploads are not supported.
- Videos cannot be removed once uploaded.
How to optimize product search terms
Search terms are keywords that are crucial to creating effective, engaging product page content. These terms help Amazon index relevant keywords associated with the product, improving its visibility. While shoppers don’t see these terms directly, they are stored in the product listing’s backend. Proper use of search terms enhances your product’s discoverability, boosting its ranking on search results pages.
- Only include broad, general keywords relevant to the product.
- Skip hyphens, colons, and other punctuation marks.
- Repeating the same words within the search terms field should be avoided.
- Choose either the singular or plural form of a word; there’s no need to include both.
- You may use all lowercase letters for search terms.
- Include abbreviations, alternative names, spelling variations, and relevant phrases for better coverage.
Amazon’s Industry Specific Guidelines
Since not all products are the same, certain items require special attention during the shoot. This section is dedicated to highlighting those cases and ensuring the necessary care is taken.
a. Apparel Products
- The main image for clothing must be either on-figure (worn by a model) or presented using a flat lay.
- When using a human model, the main image should only show from the nose down. Additional images may include the model’s face.
- A solid-colored, flesh-toned, and transparent mannequin should be used for displaying apparel.
- For ghost mannequin images, garments must be fully visible, cropping or obscuring any part of the clothing is not permitted. Simply removing the mannequin is not acceptable.
- Adult clothing must be photographed on a model.
- In on-figure main images, the model should stand in a natural pose that clearly displays the entire garment.
- The model’s hair should be styled behind the shoulders to ensure the clothing remains fully visible.
- Children’s and infants’ apparel must be photographed without a model.
- Multi-pack clothing or accessories should be captured using off-figure or flat-lay techniques.
- Images must be high-resolution at 72 DPI (dots per inch)
Recommended camera settings:
- Aperture: F8 to F11
- Shutter Speed: 1/160 to 1/1000 seconds
- Mannequin parts should not be visible in product images; only the clothing should appear.
- Do not include props, such as food or unrelated items, in main images featuring a model unless they are part of the product.
- Use props and accessories in supporting or additional images only to enhance the presentation.
- Do not use the ghost mannequin effect in the main (hero) image; it is allowed only in secondary images.
- Do not display second-hand or previously used products in any images.
b. Shoes
- The main (hero) image must feature a single shoe, angled at 45 degrees to the left.
- A pair of shoes should not be shown in the hero image; only one shoe is allowed.
c. Jewelry
- The main image must clearly display the entire piece of Jewelry.
- You may display necklaces using cropped or partial images, provided the design remains fully visible.
- Do not use images in which the Jewelry is cut off or positioned too close to the frame.
d. Books, Videos
- The main image should feature the cover art clearly and fill the entire frame.
- Do not show products wrapped in jewel cases, cellophane, or with promotional stickers.
How Do Amazon Photos Work?
Once you’ve uploaded images that meet Amazon’s image guidelines, you’re setting the foundation for making the most of your product listings.
These images play a key role in your product description and help improve visibility in search results. When shoppers search using general keywords or phrases, Amazon’s algorithm often shows product images first, making them the initial point of engagement.
High-quality, sharp, and clearly visible photos are more likely to catch the eye of potential buyers. While additional product details support the purchase decision, it’s the images that do the heavy lifting in attracting interest and driving conversions.
Best Practices For Amazon Product Listing Images
Product images must represent the actual item, as 22% of returns are due to differences between the product and how it appears in photos.
High-quality, clean, and professional-looking images create a stronger impression and build trust with shoppers. To achieve this level of visual appeal. Make sure to follow these key practices:
1. Follow Amazon’s requirements
Adhering to Amazon’s requirements is essential for success as a seller on the platform. When sellers upload images that do not meet these standards, Amazon often removes them over time. From a professional standpoint, failing to follow these guidelines can negatively impact your credibility and business.
Final Reminder: Key Actions to Take
- Focus on optimizing your product page.
- Ensure your images meet all technical requirements.
- Strictly follow Amazon’s image standards.
2. Single Product in the Hero Image
Your hero image should feature only the main product, without any additional clutter in the frame. As the primary visual representation of your product, the main image plays a crucial role in capturing potential buyers’ attention. Ensure it is clear, well-lit, and visually appealing. To stay safe, take note of what top sellers in your category are doing on Amazon for guidance.
3. Genuine diversity
Sellers can showcase product variations in the main image. However, it is essential that the product remains the focal point, set against a clean, white background to maintain clarity and focus.
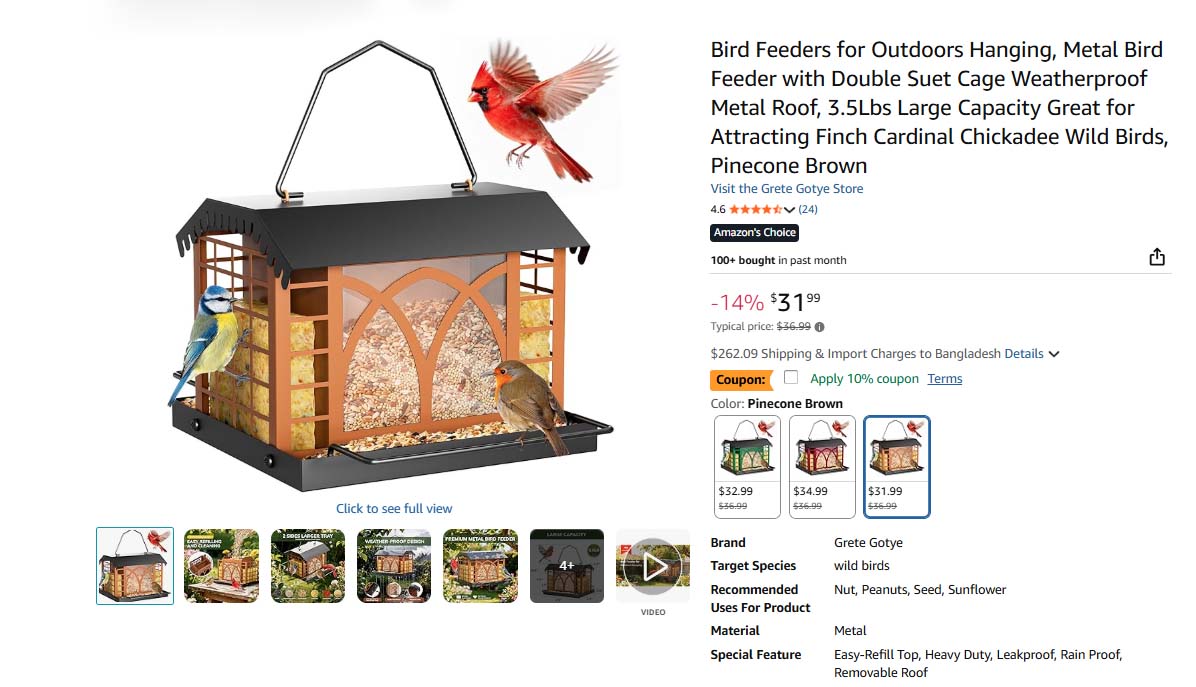
Media-Amazon has highlighted this approach effectively. For example:
Sellers have the flexibility to showcase their products creatively, as long as the product remains the focal point and complies with Amazon’s guidelines. Amazon permits the presentation as long as it remains authentic and realistic.
4. Multiple shots
A common mistake many sellers make is not providing enough images. While Amazon allows up to 9 images per listing, simply uploading them isn’t enough. Each image should offer a comprehensive view of the product, highlighting its features and functionality to give potential buyers a complete understanding.
5. Enabling Zoom
Since online shoppers cannot physically interact with products, the ability to zoom in on images has become a highly effective way to boost sales. This feature allows customers to examine products up close, offering a more realistic perspective. As a result, it plays a key role in increasing click-through rates (CTR).
6. Good quality photos
All your efforts will be in vain if the images don’t meet high standards. Hiring a professional product photographer is often the best way to ensure your photos are of top quality and effectively showcase your products.
Perfection may be difficult to achieve, but you can correct imperfections effectively. Even if your photos aren’t flawless, there are technical solutions to enhance them and meet the required standards. This is where a professional photo editing service comes in. Ensure you have the best tools and resources to showcase your products effectively.
7. A/B Testing
Before finalizing your images, it’s important to run a final test called A/B Testing or Split Testing. This test helps determine which images generate the best response from potential buyers.
Even small adjustments can significantly impact performance, and A/B testing allows sellers to identify the most effective images for maximum engagement.
Final Thoughts
Meeting Amazon’s product image size and quality requirements in 2026 is not just about avoiding rejections—it’s about building trust, improving visibility, and increasing conversions. When your images follow Amazon’s guidelines, they load faster, display better, and help shoppers clearly understand what they are buying. From the hero image to supporting visuals and videos, every image should accurately and professionally represent your product.
If creating perfect images feels challenging, remember that photography and editing go hand in hand. The right strategy and professional support can enhance even standard images to meet Amazon’s strict quality standards. At Grasigner, we help sellers present their products at their best with professional image editing that aligns with Amazon’s requirements. Follow the guidelines, focus on quality, test what works, and let your images do the selling for you.
The post Amazon Product Image Size Requirements – The Ultimate Guide in 2026 appeared first on Grasigner .
]]>The post The Ultimate Guide to Professional Ghost Mannequin Services appeared first on Grasigner .
]]>Ghost mannequin photography and editing allow businesses to showcase clothing in the most realistic way possible without distracting props or visible mannequins. The result is a professional, clean, and attractive product image that improves conversions and makes your store look trustworthy.
In this article, we will explore everything you need to know about ghost mannequins, including how the technique works, why it is important for eCommerce, the benefits of ghost mannequin services, and how to choose the right ghost mannequin photo editing provider.
What is a Ghost Mannequin?
A ghost mannequin (also known as an invisible mannequin effect) is a photo editing technique used in fashion product photography. The process involves photographing clothing on a mannequin and then digitally removing the mannequin during post-production.
This editing style creates the illusion that the clothing is being worn by an invisible model. The final image highlights the shape, fit, and design of the apparel without distractions.
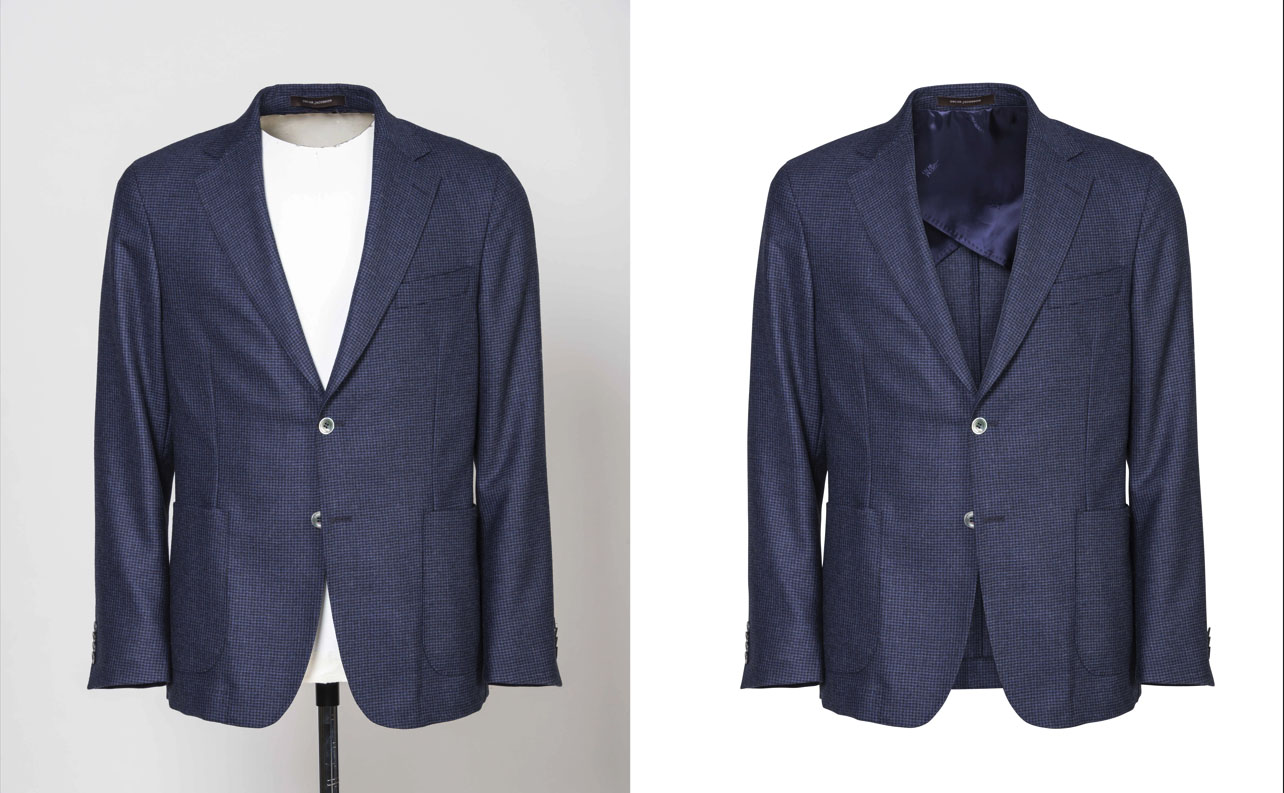
For example:
- A jacket photographed on a mannequin appears flat when the mannequin remains visible.
- But after ghost mannequin editing, the jacket looks as though it is worn by an invisible person—clean, 3D, and professional.
Why Ghost Mannequins are Important for eCommerce
When customers shop for clothing online, they want to see how a piece will look in real life. Flat-lay images often fail to give that realistic view. This is where ghost mannequin photo editing services make a difference.
1. Creates a Professional Look
Using the ghost mannequin technique, your products achieve a polished and consistent look across your website, enhancing professionalism, building customer trust, and boosting brand value.
2. Highlights Product Details
By removing distractions, customers can focus on the clothing’s fit, neckline, stitching, and texture. This boosts confidence and reduces return rates.
3. Cost-Effective Compared to Models
Hiring models for every photoshoot can be expensive. Ghost mannequin services allow you to achieve the same natural look without the extra cost.
4. Increases Sales and Conversions
Studies show that high-quality product images lead to more sales. With ghost mannequin editing, your store stands out against competitors.
How Ghost Mannequin Editing Works
The ghost mannequin process is a precise workflow that combines professional photography with advanced editing techniques to produce clean, realistic product images.
Step 1: Product Photography
Clothing items are photographed on a mannequin. Sometimes, multiple shots are taken, for example, the front view, back view, and inside neck area.
Step 2: Photo Selection
The best images are selected for editing. Consistency in lighting and angle is important to achieve professional results.
Step 3: Mannequin Removal
Using professional editing software (like Adobe Photoshop), the mannequin is carefully removed. This step ensures that only the clothing remains visible.
Step 4: Combining Images
If certain areas (like the inside collar or sleeves) are missing, editors merge multiple photos to create a natural, 3D look.
Step 5: Final Retouching
Shadows, wrinkles, lighting adjustments, and background removal are added to perfect the final image.
Benefits of Ghost Mannequin Services
Outsourcing to a professional ghost mannequin service saves time, money, and resources. Let’s explore the main benefits:
1. Consistency Across Catalogs
Professional ghost mannequin photo editing ensures all product images follow the same style and background, making your website look clean and attractive.
2. Faster Turnaround
Editing large product catalogs in-house can be time-consuming. Ghost mannequin services deliver edited photos quickly so you can upload products faster.
3. Expert Quality
Trained editors know how to create the perfect ghost mannequin effect—highlighting shape and texture while maintaining natural shadows.
4. Scalable for Any Business
Whether you need editing for 50 images or 5,000, ghost mannequin services can scale according to your needs.
Ghost Mannequin vs. Other Product Photography Styles
When choosing product photography styles, businesses often compare ghost mannequins with other techniques.
- Flat Lay Photography: Flat lay photography is a simple, professional style that displays products from a top-down perspective. It creates clean, organized visuals that are easy to understand and visually appealing. While this approach is quick and effective for showcasing details, it offers limited depth and dimension compared to other photography styles.
- Model Photography : Model photography presents products in a realistic and lifestyle-focused way by showing them worn or used by real people. This approach helps customers better understand fit, scale, and overall appearance. However, it often requires higher budgets, professional models, and longer production time compared to simpler photography styles.
- Ghost Mannequin Photography: A professional, polished way to present apparel with a realistic shape and clean structure. It highlights fit and design details without distractions, creating a consistent look for eCommerce use. This method provides an effective balance between production cost, visual quality, and realistic product presentation.
For fashion retailers, the ghost mannequin effect is the most effective style for online stores.
Ghost Mannequin for Sale – Do You Need It?
Some businesses purchase ghost mannequins for sale to use during photography sessions. These mannequins are specially designed with removable parts (such as necks or arms), making the editing process easier.
While ghost mannequins for sale are useful for in-house photography teams, not every business needs them. Many companies prefer to outsource their photography and editing to a professional ghost mannequin photography service instead.
What is the Ghost Mannequin process?
The ghost mannequin process is a clear, efficient method for transforming raw apparel photos into clean, professional product images. Below is a step-by-step overview of the process:
1. Product Preparation
- Steam or iron garments to remove wrinkles
- Place the item on a mannequin or hanger to maintain proper shape
2. Photography
- Capture images of the garment on a mannequin or hanger
- Take multiple angles, including front, back, and inner details such as collars or linings
- Use proper lighting and a neutral background to simplify editing
3. Image Selection
- Choose the best photos with clear visibility of all important design details
4. Mannequin Removal & Editing
- Use professional tools like Adobe Photoshop to remove the mannequin or hanger
- Rebuild missing areas such as necklines, sleeves, or inner sections
5. Image Enhancement
- Adjust color, brightness, and shadows for a natural look
- Remove fabric flaws, dust, and minor wrinkles
6. Final Export
- Crop and format images according to the eCommerce platform requirements
- Deliver high-resolution images that load quickly and display clearly
How Grasigner Gives You Perfect Editing?
Grasigner is a trusted choice for professional image editing solutions, with a strong focus on ghost mannequin services. Our skilled team brings years of hands-on experience in apparel photo editing, ensuring every image looks clean, realistic, and visually appealing. We work closely with our clients to understand their exact requirements and deliver consistent, high-quality results. With attention to detail, fast turnaround times, and reliable support, Grasigner helps brands present their products professionally and confidently across all digital platforms.
Choosing the Right Ghost Mannequin Photo Editing Service
With so many providers offering ghost mannequin editing, selecting the right service can feel overwhelming. Here are some tips:
- Check Portfolio – Review before-and-after samples to judge quality.
- Turnaround Time – Choose a service that matches your deadlines.
- Pricing – Look for competitive pricing without sacrificing quality.
- Scalability – Ensure the service can handle large volumes of orders.
- Customer Reviews – Positive feedback shows trustworthiness.
Who Needs Ghost Mannequin Services?
Ghost mannequin services are widely used across the fashion and retail industry to create clean, professional apparel images. They are commonly chosen by online clothing stores, fashion brands, and e-commerce sellers on platforms such as Amazon, eBay, and Shopify. Catalog publishers and photography studios also rely on this service to maintain a consistent visual style. If your business sells clothing online, ghost mannequin photo editing can greatly enhance product presentation, improve visual clarity, and help build customer trust.
These services are widely used in the fashion and retail industry, including:
- Online clothing stores
- Fashion brands
- E-commerce platforms (Amazon, eBay, Shopify sellers)
- Catalog publishers
- Photography studios
If your business sells apparel online, ghost mannequin photo editing services can significantly improve your product presentation.
Here’s Why You Should Invest in Ghost Mannequin Services Today!
The e-commerce industry is more competitive than ever, and high-quality product images play a key role in business success. Ghost mannequin services help brands present apparel in a clean, professional, and realistic way without high production costs. This technique improves product appearance, builds customer trust, and supports higher conversion rates.
By partnering with Grasigner, you gain access to tailored image-editing solutions that strengthen your brand identity. We customize edits for each image and catalog, ensuring consistency and visual impact. Our goal is to help your products stand out and capture customer attention in a crowded online marketplace.
Future of Ghost Mannequin Photography
As e-commerce continues to grow, demand for ghost mannequin editing will increase. Future advancements may include AI-powered editing tools and 3D virtual try-on features. However, the classic ghost mannequin effect will remain a powerful way to showcase clothing online.
High-quality visuals are the foundation of online retail success. The ghost mannequin effect helps apparel brands display their products in the most professional and attractive way possible. From saving costs to improving conversions, ghost mannequin photo editing services are a must-have for any fashion eCommerce business.
Whether you choose to invest in ghost mannequins for sale for in-house use or outsource to a professional ghost mannequin photography service, the results will speak for themselves.
Final Thought
High-quality product images are essential for success in today’s competitive e-commerce landscape, and ghost mannequin services have proven to be a game-changer for fashion and apparel businesses.
At Grasigner, we specialize in delivering professional, clean, and realistic ghost mannequin editing that highlights every detail of your products. Our experienced team provides customized, high-quality solutions that ensure your apparel stands out, builds customer trust, and boosts sales. Whether you are looking to enhance your catalog, eCommerce store, or brand presentation, Grasigner is your trusted partner for flawless image editing. Take advantage of our free trial to experience our skills and see the quality of our work firsthand.
The post The Ultimate Guide to Professional Ghost Mannequin Services appeared first on Grasigner .
]]>The post What Are The Top Teen Fashion Trends in 2026? What to wear in 2026 appeared first on Grasigner .
]]>This year, teen fashion is embracing a fresh mix of futuristic vibes and everyday comfort. From oversized layers and bold colors to sustainable fabrics and tech-inspired accessories, 2026 is all about self-expression with a modern twist. Teens are moving beyond fast fashion, choosing quality, versatility, and individuality.
Streetwear continues to evolve, mixing with minimalist pieces and vintage-inspired looks. Gender-fluid styles, smart casuals, and digital fashion also make their mark, reflecting a more inclusive and creative generation.
Whether it’s a casual day out or a bold statement piece, 2026 offers teens endless ways to express themselves confidently. Explore the top teen fashion trends in 2026 and discover what to wear to stay ahead of the curve and make your own fashion rules.
What’s Trending? The Influence of Social Media and Celebrities
The Influence of Social Media and Celebrities explores how digital platforms and famous personalities shape today’s trends. From viral fashion moments to lifestyle choices and beauty hacks, social media and celebrities now play a powerful role in driving what’s hot and what’s not.
Teens and young adults, especially, look to influencers and stars for style inspiration, product recommendations, and cultural cues. This article breaks down how platforms like Instagram, TikTok, and YouTube are setting the pace of modern trends and how celebrities turn everyday items into global must-haves.
Seasonal Must-Haves for Tweens and Teens
Find out the seasonal must-haves for tweens and teens with this style guide. From cozy winter layers to summer essentials, find out what’s trending each season and how young fashion lovers can stay stylish, comfortable, and confident year-round with the right wardrobe picks.
Winter fashion ideas for teen
Stay warm and stylish with coordinated sweater sets and oversized knits. These pieces offer the ideal balance of comfort and trendiness, making them perfect for school days when you want to stay cozy yet fashionable.
Styling Tip: Combine a chunky knit sweater with fleece-lined leggings and ankle boots for a chic, winter-ready ensemble.
Accessories: Enhance your look with a beanie or a plaid scarf for added warmth and style.
Colors to Watch: Neutral shades like beige and gray, along with rich seasonal hues like burgundy and forest.
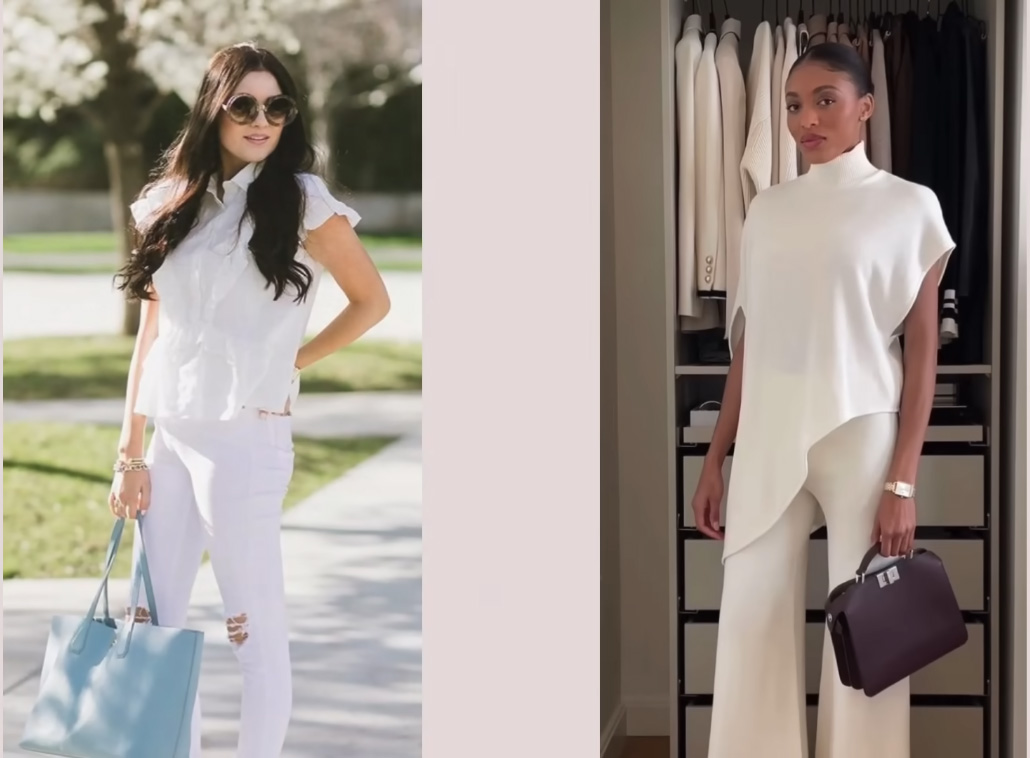
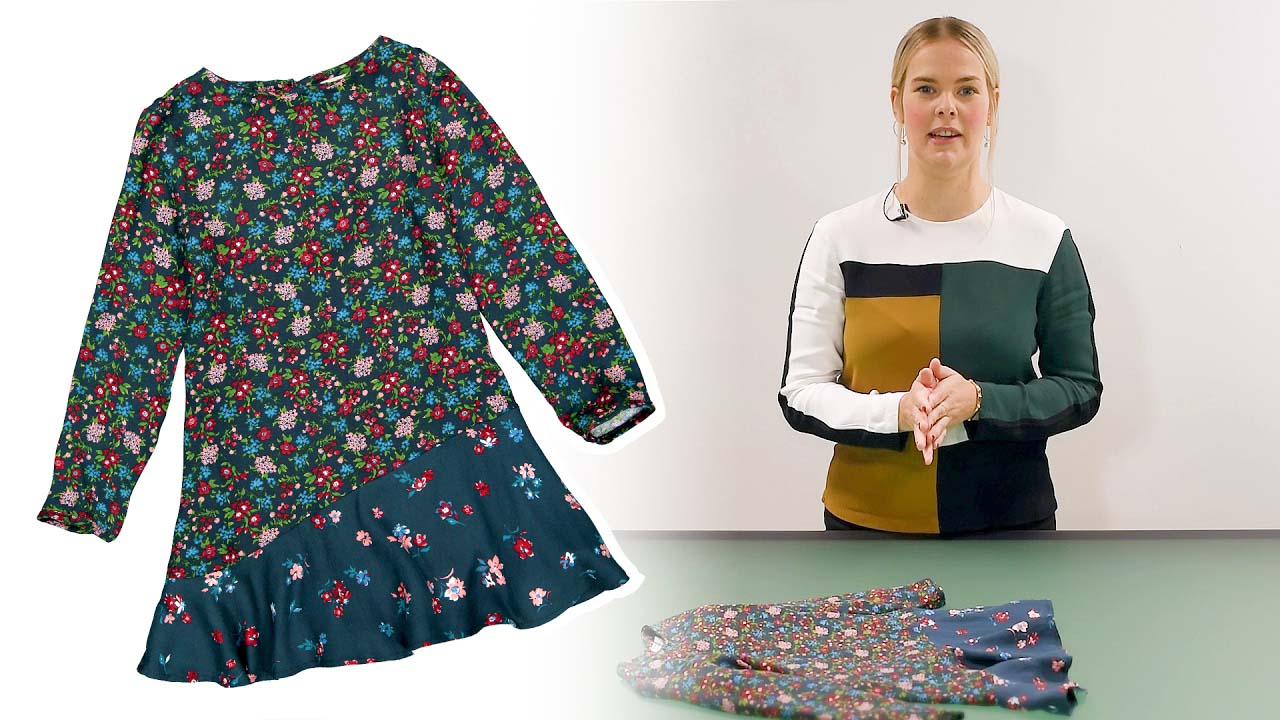
Spring fashion ideas for teen
Floral prints are making a bold return this season! Pair them with high-waisted pants or track pants for a chic, easygoing look that effortlessly blends style and comfort.
Styling Idea: Tuck a flowy floral blouse into high-waisted jeans and pair with white sneakers for a casual yet polished outfit that’s perfect for any occasion.
Accessories: Add a touch of elegance with delicate necklaces and complete the look with a straw bag or a pastel mini backpack for a playful, refined finish.
Colors to Watch: Embrace soft pastels like lavender, blush pink, and mint green, alongside vibrant shades of yellow, for a fresh and uplifting palette.
Summer fashion ideas for teen
Lightweight fabrics and airy silhouettes are essential for warm-weather fashion. Opt for sundresses, biker shorts, and crop tops for an effortless style that keeps you cool and comfortable.
Styling Idea: A tiered sundress paired with strappy sandals and a floppy hat creates the perfect look for a day out, while a crop top with denim shorts and sneakers offers a laid-back, casual vibe.
Accessories: Elevate your outfit with oversized sunglasses, playful hair clips, and a woven tote bag for a relaxed yet stylish finish.
Colors to Watch: Embrace vibrant shades like coral, aqua blue, and hot pink, complemented by crisp, fresh whites to create a lively, seasonally appropriate palette.
Back-to-School Fashion for 2026: Shopping Guide
Get ready for a stylish school year with our ultimate Back-to-School Fashion guide for 2026. You need to know how to refresh your wardrobe from trendy basics to standout statement pieces. Whether you’re looking for comfort, style, or a bit of both, discover the must-have looks that blend fashion and function for class, campus, and beyond.
Explore tips on smart shopping, outfit planning, and how to mix current trends with your personal style. With the right pieces, you’ll walk into the new school year feeling confident, comfortable, and completely on trend. Let this Back-to-School Fashion guide help you dress for success in 2026.
Practical and Trendy Comfortable Styles
Discover how to dress with ease and confidence in our guide to Practical and Trendy Comfortable Styles. The perfect balance between comfort and fashion, making it easy to feel good and look great every day.
Whether you’re heading to school, work, or a weekend outing, find pieces that are stylish and functional without sacrificing either. From soft fabrics to effortless fits, we highlight key looks that are not only wearable but also rank among the most trendy or fashionable choices this season.
Embrace a wardrobe that works with your lifestyle while keeping you on point with current trends. Let comfort and style go hand in hand with these practical outfit ideas.
Here Are The Latest Fashion Trends for teenagers in 2026
Bold colours and prints
Explore the world of bold colours and prints in this fresh take on standout style. From vibrant patterns to eye-catching hues, this article dives into how fresh prints and bold colours can transform any look.
Whether you’re updating your wardrobe or looking for ways to express your personality through fashion, bold designs offer endless options. Learn how to mix and match these statement pieces for a confident and creative style that stands out in any season. Let your outfit speak with colour and print this year.
Retro Revival and Basic Tees
Step into timeless style with Retro Revival and the charm of Basic Tees. The retro revival fashion with everyday basics for a fresh, stylish look. From retro style outfits to tips on how to dress to impress, discover how classic trends and modern comfort come together to create easy, standout outfits for any occasion.
Unisex Clothing and Sustainable Fashion
Discover the rise of Unisex Clothing and the impact of Sustainable Fashion in today’s style world. From gender-neutral baby items to eco-friendly choices for all ages, highlights the shift toward inclusive and conscious fashion. Explore top sustainable fashion brands and must-have sustainable fashion products that combine style with purpose.
A P C Jeans, Baggy Jeans, and Frayed Jeans
Explore the latest denim trends with A P C Jeans, Baggy Jeans, and Frayed Jeans. From the classic A.P.C., Jean Aaron relaxed fits like baggy jeans for men and girls. Discover how frayed jeans brands are redefining casual wear with edge and comfort, making denim a must-have in every modern wardrobe.
Athleisure and Backpacks
Dive into the trend of Athleisure and stylish Backpacks that blend comfort with fashion. Explore must-have athleisure clothing, top luxury athleisure brands, and the best backpacks for girls. Discover how to stay active and chic with top backpack brands and outfits that work for school, travel, or everyday wear.
Crop tops and Slip dresses
Explore the perfect blend of casual and chic with Crop Tops and Slip Dresses. This trend looks like crop tops for jeans, layering jeans and crop tops with jackets, and elegant options like slip dresses for prom or the sleek Skims long slip dress. Find fresh ways to style these wardrobe staples for any season or occasion.
Functional Jackets and Hoodies
Stay warm and stylish with Functional Jackets and Hoodies that blend comfort, utility, and modern design. Discover the best functional jackets for all seasons, including functional winter jackets built for warmth and durability. Plus, explore trending hoodie design ideas and creative hoodie mockup styles perfect for everyday wear or a custom look.
How to edit tweens and teens fashion photos?
At Grasigner, we believe that fashion photography for younger audiences should be both creative and responsible. In this guide on editing tweens’ and teens’ fashion photos, we share professional techniques to enhance images while maintaining a natural, age-appropriate look.
Whether you’re working with tween fashion photos, teen fashion photos, or capturing moments with tween models, female models, or cute tween models, editing should highlight the clothing and personality, not alter identity.
We also address the importance of staying clear from unethical content such as Underground child modeling photos, Mini bare child model portals, or any misuse of youth imagery. Instead, we focus on clean, respectful edits that align with industry standards.
Learn how to properly light, retouch, and present images while upholding integrity. Trust Grasigner to guide you in creating polished, professional visuals that showcase young fashion in the most tasteful, modern way.
The post What Are The Top Teen Fashion Trends in 2026? What to wear in 2026 appeared first on Grasigner .
]]>The post Mastering E-Commerce Fashion Photography for Online Retail-Complete Guide appeared first on Grasigner .
]]>You’ll learn how to craft a compelling visual narrative that resonates with your target audience, making your brand stand out in a crowded marketplace. We will also share tips on styling, model selection, and the importance of post-processing to ensure that every image reflects the quality and aesthetic of your brand.
Whether you’re a seasoned photographer or just starting, this guide will provide valuable insights into the art and science of fashion photography tailored specifically for e-commerce. Join us as we uncover the secrets to creating captivating imagery that not only attracts shoppers but also converts clicks into sales, ensuring your online retail success.
What is e-commerce model Fashion photography?
E-commerce model fashion photography refers to capturing images of models with the primary goal of showcasing products for sale on online platforms. In today’s rapidly growing online marketplace, adhering to industry standards is essential for maximizing the potential of your business and brand. By utilizing model fashion photography, you can offer customers a vivid representation of your products, highlighting various angles, lighting conditions, and how items interact with the human body.
We firmly believe that e-commerce model photography is indispensable for any business aiming to elevate their visual marketing beyond traditional flat-lay or ghost mannequin approaches. Our commitment to delivering top-quality model photography aligns with industry benchmarks, and we address a diverse range of e-commerce photography needs.
Why should you use e-commerce model photography for your business?
In today’s retail fashion landscape, e-commerce model photography has become an essential tool for any business owner. By showcasing how products are worn by real people, this photography style allows customers to visualize items in a realistic context, meeting the visual standards expected across all e-commerce platforms.
For businesses selling clothing, jewelry, footwear, or any other wearable goods, especially those operating solely online on-body model photography is crucial. Even brands with physical locations find that incorporating model photography on their online platforms enhances their presence, often enabling them to reach international markets where their physical stores may not be accessible to certain customers. This approach not only elevates your brand but also strengthens engagement with a broader audience.
What is the outlook for fashion photography?
In an ever-evolving industry, understanding the outlook for fashion photography is crucial for professionals and enthusiasts alike. As brands adapt to digital platforms and prioritize visual storytelling, the demand for innovative and impactful imagery is on the rise. We delve into the influence of social media, the integration of virtual and augmented reality, and the importance of sustainability in photography practices.
By examining these factors, we provide insights into how fashion photography will continue to transform, offering opportunities for creative expression and connection with audiences worldwide.
Why do you need on-figure model fashion photography?
The level of belief you have in your product will ultimately shape its success. The ideal approach combines various photography techniques, flat-lay, on-figure model, and ghost mannequin photography to present your product from multiple perspectives, broadening its appeal to a diverse audience. On-figure model shots provide styling ideas and demonstrate how the product fits and moves on the body.
In contrast, ghost mannequin photography highlights inner details and the product’s standalone design. By effectively showcasing your product range, high-quality e-commerce photography can also elevate your brand’s visibility, whether it’s highlighting a wide color palette for a beauty line or diverse size options for a clothing brand. In particular, model-driven e-commerce photography is rapidly gaining traction in the beauty industry.
What are the fashion photography trends for 2026?
Explore the fashion photography trends for 2026, highlighting innovative styles, emerging technologies, and how they reshape visual storytelling in the fashion industry.
Sustainable photography:
Sustainable photography focuses on minimizing environmental impact while capturing stunning images. By adopting eco-friendly practices, such as using natural lighting, reducing waste, and supporting ethical brands, photographers can create beautiful visuals without compromising the planet.
This approach not only enhances creativity but also fosters a responsible connection between art and nature.
Flat Lay Photography
Flat lay photography refers to capturing products from directly above, with the camera positioned parallel to the surface. This method is also known as “lay flat” photography. Each item is photographed completely flat, making it easy to isolate or cut out during post-production for clean, professional results.
This photography style works best for garments with simple designs and structured fabrics. Items such as t-shirts, sportswear, loungewear, cotton pajamas, children’s clothing, and knitwear naturally hold their shape when laid flat. These products look neat and balanced without the need for a mannequin. However, garments with complex cuts or soft, silky fabrics often lose form when photographed flat. In such cases, ghost mannequin photography delivers a more polished appearance.
Flat lay images are especially effective when multiple items are styled together. Clothing, accessories, and lifestyle products can be arranged into a single composition to create a visually engaging story. Lighting, spacing, and background selection play a key role in setting the mood and enhancing the overall aesthetic.
This style is widely popular on social media, particularly on Instagram, where flat lay photography is used to create consistent, eye-catching feeds. Backgrounds are carefully chosen to complement the products and color palette, helping the items stand out while maintaining a clean, cohesive look.
Retro and vintage:
Retro and vintage styles evoke nostalgia, blending timeless aesthetics with modern flair. From fashion and interior design to photography and music, these trends celebrate the charm of past eras while adding a fresh twist.
Embracing vintage pieces or retro-inspired designs allows individuals to express their unique style, creating a connection to history while staying relevant today. Whether it’s through color schemes, patterns, or classic accessories, retro and vintage trends continue to influence contemporary culture.
Portraits:
Discover the art of “Portraits” in this insightful article, where we explore the essence of capturing human emotion, personality, and identity through a lens. Whether you’re a photographer or an enthusiast, this guide dives into the techniques, styles, and history of portrait photography.
Learn how to enhance your skills and create powerful, timeless portraits that speak volumes about the subjects they represent. Ideal for anyone passionate about photography or visual storytelling.
Authenticity:
Explore the concept of “Authenticity” in this thought-provoking article, where we delve into the importance of being true to oneself in both personal and professional settings. Learn how embracing authenticity can foster genuine connections, build trust, and drive success.
Whether in communication, relationships, or leadership, understanding and embodying authenticity can lead to more meaningful interactions and a more fulfilling life. A must-read for those seeking to live and work with purpose and integrity.
Why Should E-commerce On-Model Fashion Photography Editing Services
In a competitive online market, high-quality E-commerce On-Model Fashion Photography Editing Services are essential for showcasing your products in the best light. The importance of professional editing to improve your model fashion images, making them more engaging and appealing to potential customers.
Proper editing can refine details, improve lighting, and ensure consistency across your product shots, ultimately boosting sales and brand recognition. At Grasigner, we specialize in providing expert photography editing services tailored to meet the unique needs of your e-commerce business.
Final Thought
Our team ensures that every image reflects the true essence of your brand while maintaining a polished, market-ready look. Discover how Grasigner’s editing solutions can elevate your product presentations. Contact us today to learn more about how we can help transform your fashion photography for online success.
Mastering e-commerce fashion photography is a powerful way to elevate your online retail business. By focusing on quality, consistency, and creativity, you can create visuals that resonate with your audience and build trust in your brand. Whether you’re just starting or looking to refine your approach, this guide provides the foundation for creating stunning product imagery that drives sales and sets your brand apart in the competitive e-commerce landscape.
The post Mastering E-Commerce Fashion Photography for Online Retail-Complete Guide appeared first on Grasigner .
]]>The post Ghost Mannequin Photography 2026: Pro Secrets for Invisible Mannequin Perfection appeared first on Grasigner .
]]>Capturing images of clothing without a mannequin can be challenging, often requiring extensive time spent editing and refining photos with complex tools like Photoshop.
Fortunately, with Photoroom, achieving professional-grade photos is easier than ever. Based on feedback from our community of resellers, makers, and small business owners, we recognized a growing need for guidance on mastering the ghost mannequin effect. That’s why we’ve created this guide to help you elevate your product photography from basic to professional in just a few minutes. Just like this:
What is ghost mannequin photography?
Ghost mannequin photography, also referred to as invisible mannequin or hollow man photography, is a specialized technique used in apparel photography. Photographers use this method to fully utilize our ghost mannequin services, capturing clothing in a way that highlights its fit and structure without the distraction of a visible mannequin.
The objective is to capture both the interior and exterior of a garment, typically using a mannequin or model. Once the photoshoot is complete, the images are sent to a professional editing service, such as Tech Cloud Ltd, where the mannequin or model is digitally removed during post-production. This process creates the illusion that an invisible person is wearing the clothing.
Traditionally, apparel photography follows one of these methods:
- Hiring models: While effective, this approach can be both expensive and time-intensive.
- Using mannequins: Although practical, mannequins can sometimes divert attention from the garment and conceal essential design details.
- Flat-lay photography: Photographing clothes laid flat on a surface can work for specific items, but it fails to effectively highlight the garment’s fit and structure.
Ghost mannequin photography blends the benefits of traditional methods while eliminating their limitations. It offers a realistic representation of clothing as if being worn, without the costs or distractions of using models or mannequins.
This photography technique is both contemporary and highly effective at creating visually consistent product images, which are crucial for establishing and maintaining a strong brand identity.
By utilizing the proper lighting, angles, and expert ghost mannequin photo editing, the final product images achieve a polished, professional look. This ensures customers receive a clear and precise representation of your garments.
What is the ghost mannequin effect?
The ghost mannequin effect is a post-production technique used in product photography to create a realistic 3D appearance of clothing. This method gives the illusion that the garment is being worn by an invisible figure, offering a clean, polished, and seamless look that highlights the clothing’s design and structure.
This technique enhances the visual presentation of clothing, offering customers a more accurate representation of how the item will fit, thereby increasing their confidence in making a purchase. Curious about how ghost mannequin photography operates?
The process entails capturing the garment on a mannequin from various angles, then using advanced editing software to remove the mannequin in post-production, preserving the garment’s natural shape and structure.
Here’s how the ghost mannequin effect in photography is achieved:
- Image Capture: Images are captured from multiple angles to showcase the clothing on the mannequin. Additional shots of internal details, such as the neck and sleeves, are also taken to ensure a comprehensive 3D effect.
- Clipping Path: A clipping path is meticulously applied around the product to separate it from both the mannequin and the background. This precise cut is crucial for achieving the floating effect.
- Mannequin Removal: Image editing tools, such as Photoshop’s Magic Wand or Lasso Tool, are employed to remove the mannequin. Additional images of internal areas, such as necklines and sleeves, are then incorporated to complete the final look.
- Combining Shots: Interior and exterior shots are seamlessly combined to form a complete image, free of the mannequin. Techniques such as neck, sleeve, or bottom joints are applied according to the garment’s specific design.
- Refining the Image: Using tools like Refine Edge, the cutout is refined for a smooth finish. Additional adjustments to contrast, shadows, and brightness are made to ensure a polished and professional final image.
This process ensures that the ghost mannequin product photography showcases the garment in the best possible way, providing a clean, professional, and distraction-free visual.
How to create a ghost mannequin image?
Choose the right model or mannequin:
Utilizing models or mannequins is crucial in apparel photography to highlight the distinct shape and fit of each garment. However, the primary objective is often to remove these supports in the final images, achieving the seamless effect of the ghost mannequin technique.
This technique creates the illusion of clothing suspended in space, requiring precise editing to perfect, which can be challenging for beginners in image editing. By photographing your product from multiple angles on a model (even yourself) or mannequin, you can gather a diverse and engaging set of visuals for your online listings.
For the best results, photographing models in static poses ensures a smooth transition to ghost mannequin images. Simplifying the model’s attire and tying back long hair reduces distractions, keeping the focus on the product. This method enhances visual appeal and simplifies the editing process, resulting in a polished outcome.
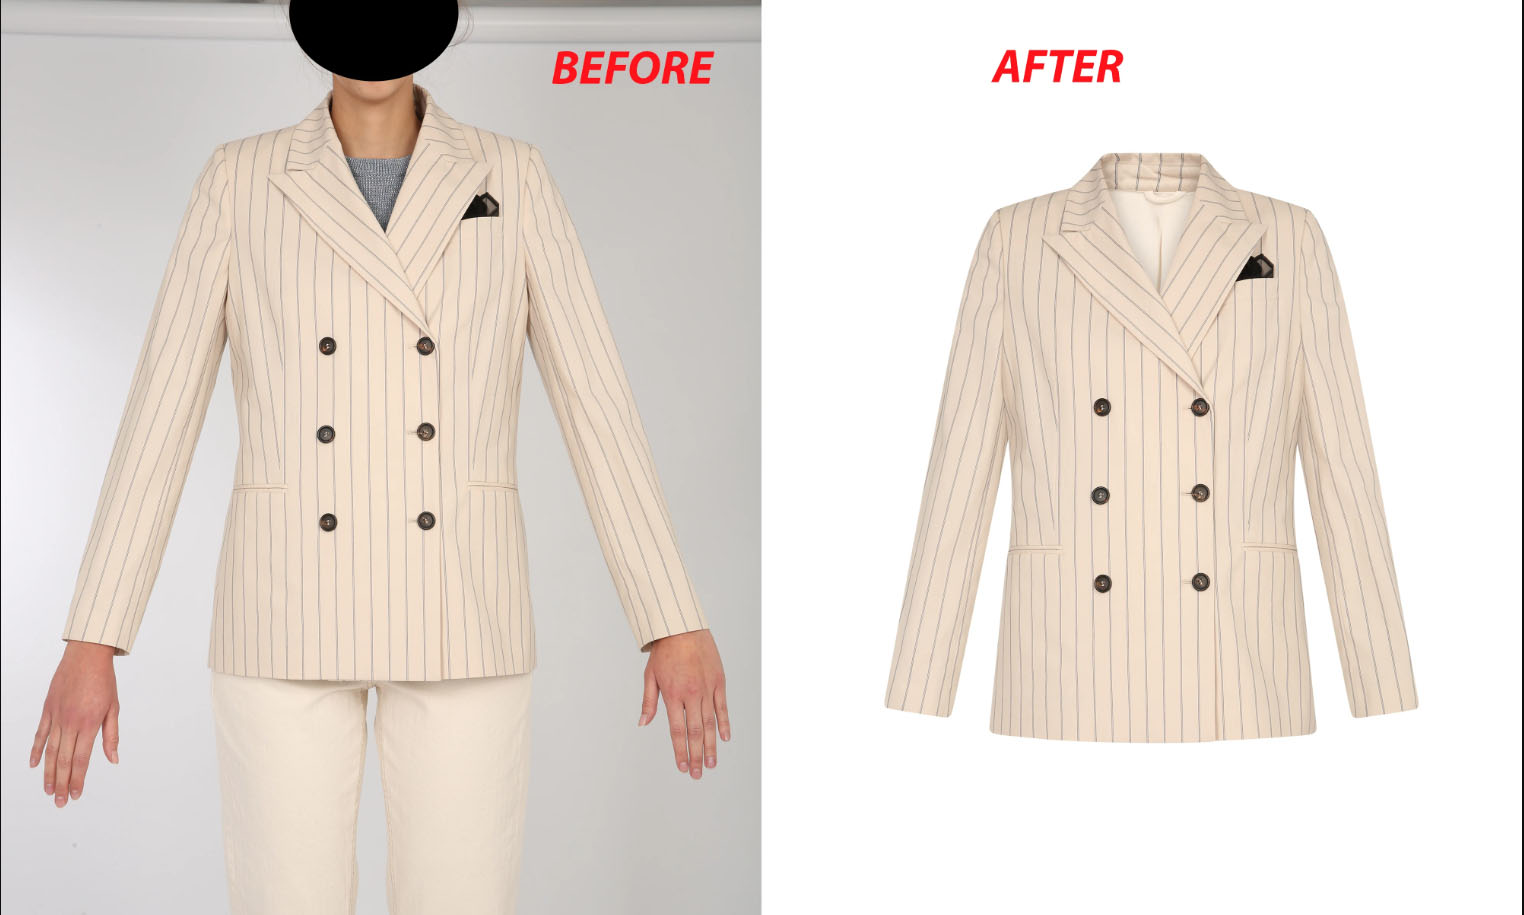
The choice of a mannequin is essential, as it directly affects the final image. White matte mannequins are often preferred for their non-reflective surfaces, making them ideal for shooting against white backgrounds. This choice not only enhances the product’s visibility but also simplifies the editing process.
The fit of the clothing on the model or mannequin is vital for accurately showcasing the product. Proper sizing and adjustments ensure a clear, professional presentation.
Use the right equipment and setup:
Creating the ghost mannequin effect typically requires high-quality studio photos, which can be costly and time-consuming. Renting space and equipment or converting your home into a studio can be expensive. Fortunately, we offer a practical solution that lets you achieve the ghost mannequin look without a mannequin or a professional camera.
To get started, you’ll need:
- A smartphone (ensure the lens is clean before use)
- A selfie tripod or a stack of books to steady your phone
- Natural lighting for the best results
- A mannequin, model, friend, or even your own body to showcase the product effectively.
Photograph your products:
When photographing tops, position your camera at the garment’s chest level for the most flattering angle. For bottoms, align the camera with the hip area. Avoid shooting from angles that are too high or low, as this can distort the garment, creating an unflattering, inaccurate appearance.
Your setup plays a crucial role in achieving quality images. Ensure there is an adequate distance between your camera (such as your smartphone) and the mannequin or model. Position your natural light source behind the camera lens, and place the mannequin or model in front of a clean, uncluttered white wall or background for the best effect.
Take multiple shots
Taking multiple shots from different angles ensures you capture all the necessary details for high-quality post-production work. This approach provides a comprehensive view, allowing for better editing and refinement of the final image.
Front and Back Views: Photograph the front and back of each garment, along with inside-out shots to capture details like tags, necklines, and linings. These images will be merged in post-production to create the ghost mannequin effect.
Close-Up Shots: Capture both the front and back of each garment, along with inside-out shots to highlight details such as tags, necklines, and linings. These images will be combined in post-production to create the seamless ghost mannequin effect, showcasing every aspect of the garment.
Multiple Angles: Capture additional shots from various angles to provide more flexibility in post-production. This ensures that no critical details are overlooked, giving you a broader range of options for refining the final image.
Ghost mannequin photography techniques for different fabrics
Once you’ve mastered the fundamentals of ghost mannequin photography, there are always opportunities to refine your technique for even better results. Whether it’s your first shoot or you’re aiming to enhance your product images, these expert tips will elevate your photography and make your work truly shine.
1. Working with different fabrics
For delicate fabrics like chiffon or silk, which may wrinkle or become too sheer under bright lighting, use softer, diffused lighting to achieve a smoother effect. Additionally, placing a neutral liner beneath sheer garments can add structure and reduce transparency, enhancing the ghost mannequin images.
- Lightweight Fabrics: For fabrics like chiffon or silk, which may wrinkle or become too transparent under bright lighting, it’s best to use softer, diffused lighting. Additionally, placing a neutral liner beneath sheer fabrics can add structure and reduce transparency, enhancing the clarity of your ghost mannequin images.
- Thick and Textured Fabrics: Wool, knitwear, and denim require careful lighting to accentuate their texture without overexposing it. For thicker fabrics, consider adding extra padding to the mannequin to better showcase its natural shape during your ghost mannequin photography sessions.
- Reflective Fabrics: Satin and sequined materials can create unwanted glare, potentially compromising the shot. To reduce this effect, adjust the lighting angle or use diffusers to soften the light, ensuring your ghost mannequin photos are clear and free from harsh reflections.
2. Capturing intricate details
To stand out in online shopping, it’s essential to highlight more than just the garment’s overall shape. You must focus on the finer details. Close-up shots of key features are crucial for showcasing these elements and capturing potential buyers’ attention.
- Detail Shots: Highlight features such as zippers, buttons, embroidery, and other distinctive elements. These details help buyers appreciate the product’s quality and design, often serving as key factors in their decision to purchase.
When capturing images for the ghost mannequin effect, it’s essential to pay close attention to areas such as the neckline, collar, and seams, as they often require detailed editing. Ensure these areas are photographed clearly and from various angles to facilitate a seamless post-production process.
3. Camera positioning for different garment types
The positioning of your camera is crucial to the success of your ghost mannequin photography. Each garment requires a specific angle to effectively highlight its best features, ensuring a more appealing and accurate representation.
- Tops (Shirts, Jackets): Position the camera at the chest or neckline level to best capture the garment’s structure. Be mindful of the sleeves and collar, ensuring they appear natural and well-defined to enhance the overall presentation.
- Bottoms (Pants, Skirts): Position the camera at waist or hip level to ensure that pants or skirts drape naturally. For skirts, using pins can add dimension, preventing the garment from appearing flat and enhancing its overall shape.
- Dresses: A full-body shot is essential to showcase the fabric’s flow. Additionally, capture close-up images of key details such as the neckline, waist, and hemline, as these elements often influence a customer’s purchasing decision.
4. Minimize distractions
Ghost mannequin photography aims to highlight the garment without distractions, making it crucial to maintain a clean, clutter-free setup that keeps attention focused on the product.
- Simple Backgrounds: A simple white or gray background is ideal for most ghost mannequin photography. It directs the viewer’s attention to the product while simplifying post-production editing, ensuring a cleaner, more polished final image.
A simpler background leads to quicker, more consistent editing across multiple product images, enabling a smoother workflow and a unified final result.
What are the benefits of using ghost mannequins for e-commerce
Earlier in this article, we explored the primary advantages of ghost mannequin photography. If you’re still hesitant about integrating it into your e-commerce strategy, consider these additional compelling reasons to make the shift.
1. Clarity and transparency
One of the key benefits of ghost mannequin product photography is its ability to showcase the garment’s proper shape and fit with complete clarity, free of distractions.
This clear presentation enhances customer confidence, allowing them to visualize how the clothing will appear when worn. It’s a primary reason why the ghost mannequin effect is so successful in driving online sales.
2. Consistent look across product listings
In e-commerce, consistency is key. The ghost mannequin effect ensures a uniform look across all product images, giving your store a cohesive, polished appearance.
Whether you’re selling on Shopify, Amazon, or your own website, maintaining a consistent visual style fosters trust and encourages higher conversion rates.
3. Reduces hassles of model photography
Organizing a photo shoot with models can be complex and time-consuming, requiring scheduling, styling, and coordination. Invisible mannequin photography removes these challenges, streamlining the entire process.
This approach allows you to concentrate entirely on the product, streamlining the process while ensuring the garment remains the focal point.
4. Saves time in post-production
Since ghost mannequin photography doesn’t involve live models, it typically requires less post-production time. With no need for skin retouching or complicated lighting adjustments, the photo editing process becomes much more efficient.
This results in faster turnaround times and quicker uploads of product images to your website.
5. Gives you a competitive edge
High-quality visuals play a crucial role in capturing attention in the e-commerce world. Ghost mannequin photography provides a sleek, professional appearance that can differentiate your online store from competitors using less refined imagery.
It’s a modest investment that can significantly enhance your ability to attract shoppers and drive conversions.
6. Improves product appearance
Ultimately, ghost mannequin photography ensures your garments are showcased at their best. The 3D invisible mannequin effect provides customers with a realistic view of the product’s fit and shape.
This not only boosts the appeal of the clothing but also significantly minimizes the likelihood of returns due to mismatched expectations.
Ready to enhance your sales and minimize returns with expert ghost mannequin photo editing? Reach out to us today and set your e-commerce business up for success!
Why should you invest in ghost mannequin image editing services?
The days of visiting multiple stores in search of the perfect outfit are behind us. As more apparel businesses transition to e-commerce and shoppers increasingly turn to online platforms for clothing purchases, the importance of high-quality product images is greater than ever.
These visuals not only elevate your brand image but also increase customer engagement, improve conversion rates, and ultimately drive sales.
To make your clothing product photographs truly stand out, take advantage of our expert ghost mannequin photography service.
This approach ensures your clothing products capture the attention of potential customers and encourage them to click the ‘buy now’ button.
Still uncertain? No worries. We offer a free trial so you can experience the quality and attention we bring to every project. This risk-free opportunity allows you to see firsthand how our ghost mannequin effect can elevate your product photos and strengthen your brand.
Allow us to help you create a lasting first impression on your customers—experience the impact of our expert ghost mannequin service today.
Boost your sales, elevate your brand’s presence, and let your clothing make a lasting impression!
Mastering ghost mannequin photography can transform your online sales by presenting your products in a polished, engaging way, without the high costs and complexity of traditional photography. By selecting the correct mannequin, setting up properly, and following this straightforward guide, you can showcase the fit and design of your garments in a way that captivates customers.
The post Ghost Mannequin Photography 2026: Pro Secrets for Invisible Mannequin Perfection appeared first on Grasigner .
]]>The post How Much Does E-commerce Product Photography Cost in 2026 appeared first on Grasigner .
]]>A well-organized pricing list not only reflects the value of your work but also positions you more effectively in a competitive marketplace. It’s completely natural to feel uncertain when determining your rates.
After all, your pricing impacts your compensation, profitability, and ability to cover operational costs. That’s why it’s vital to approach this decision with careful planning and insight.
To help you through this process, I’ve created a comprehensive guide that outlines the key elements of product photography pricing. This resource covers the importance of strategic pricing, essential factors to consider before setting your rates, a practical pricing list, and actionable tips to help your earnings and client satisfaction.
Why Should You Hire A Professional Product Photographer?
Photography is no longer considered a hobby. It has become a thriving industry with a growing economic footprint. While many photographers still enjoy photography as a hobby, professional landscape photography continues to expand rapidly.
Among the many specialized fields, product photography has been chosen as a micro-niche. With the surge in e-commerce and digital marketing, businesses increasingly rely on high-quality product images to drive engagement and sales.
There are numerous compelling reasons why individuals pursue a career in product photography. Chief among them is its viability as a rewarding profession, driven by the rising demand across the commercial sector. Product photography not only serves essential commercial functions, but it also stands at the intersection of creativity and strategy in an increasingly competitive marketplace.
Take a look at the compelling reasons why pursuing a career in product photography could be a smart choice, and why your decision to enter this field may be more valuable than you realize-
Work in a Broad Arena
Product photography offers a broad and versatile field. You can prefer Jewelry, footwear, apparel, or other consumer goods. You may also choose to focus on e-commerce platforms such as Amazon or eBay, where demand for high-quality product imagery is constant. It depends on you.
Deep Insight in your work
As a product photographer, you develop a keen eye for every subtle detail. Whether working with simple or intricate items, you grasp the essential elements that must be captured. All while aligning your work with your target audience’s specific expectations.
Develop Entrepreneurial skills
As a product photographer, you have the opportunity to work across a diverse range of commercial platforms, expanding your reach and skill set. This exposure allows you to acquire a variety of valuable competencies, such as…
- Image marketing tactics
- Business tactics and acumen
- Photo editing software knowledge
- Social media marketing
- Entrepreneurial skills like decision-making, presentation, research, collaboration, etc.
Learn to be tech-savvy
Every passing day, technological advancements continue to shape the photography industry, from cutting-edge camera lenses, software, and other equipment. As a result, photographers have a deeper knowledge and mastery of the latest tools and techniques. This ongoing development enhances their expertise, elevates their professional status, and increases the value they bring to their work.
Get Sell your Work at a Premium Price
You have the opportunity to showcase and monetize your work through various platforms such as Alamy, iStock, Etsy, and Adobe Stock, each offering a wide range of niches for your images. By becoming a contributor to these sites, you can earn compensation for your creative assets while reaching a global audience.
Your Work Get Recognized
Through your work, you empower your clients to enhance their reputation, build trust, and project professionalism. The quality of your photography directly influences their sales and conversion rates, leading to greater recognition of your contributions.
Collaborate with an e-commerce Businessman
Many businesses prefer to collaborate with professional product photographers to streamline their processes and save valuable time. As a product photographer, you gain the opportunity to partner with e-commerce business owners and commercial clients, offering tailored solutions to elevate their visual presence.
Research indicates that 75% of online shoppers make purchase decisions based on product images, underscoring the critical role photographers play in influencing consumer behavior. By understanding client needs and market trends, product photographers can craft compelling visuals that resonate with the target audience.
With expertise and creativity, product photographers can build a powerful portfolio that not only enhances client brands but also helps them stand out in a competitive marketplace.
Why Should You Need a Clear Idea on Product Photography Cost?
Pricing is one of the most challenging aspects to navigate in the field of product photography. Determining a rate that reflects your value without underselling your work,or discouraging potential clients requires a careful balance. Your pricing should be both strategic and aligned with the quality and effort you invest.
Before we explore why a clear understanding of product photography pricing is essential, let’s consider the impact of getting it wrong.
Your hesitation in setting your prices can lead to serious consequences. As you know, pricing not only represents the worth of your work but also communicates your professional value to potential clients. Inaccurate pricing can result in two major issues: underpricing, which devalues your expertise, or overpricing, which may drive clients away. Striking the right balance is crucial for long-term success and recognition in this competitive field.
Underpricing your work may seem like a strategy to attract more clients, but it often leads to unintended consequences:
- You lose quality customers.
- Clients will judge your capability.
- Your expertise will be in question.
- The profit won’t be much even if you get more clients.
Overpricing may seem like a strategy to attract premium clients, but without strong branding and clear value. It can backfire leading to lost opportunities and reduced client trust.
- Clients hesitate to pay more unless your brand, marketing, and value clearly justify the price.
- High prices may deter clients and leave you trailing behind competitors.
Not having clear pricing ideas can reduce your profits. It’s up to you to set prices that match your value. Smart pricing sends a strong message to potential clients and shows that you understand your worth. Setting the right price from the beginning can give you an early advantage.
Knowing how to price your product correctly plays a key role in growing your business. Among the many benefits it brings, these are some of the most important.
- You get to stay competitive.
- You show the value of your services.
- Your profit remains secure.
- You attract better customers.
Setting the right price for your services depends on several factors, including your costs, time, effort, and overall investment. To charge fairly and sustainably, these elements must be carefully considered. Without a clear understanding of pricing, maintaining long-term business success can be challenging.
How much do you charge for product photography?
Determining your value as a photographer can be challenging. How much you earn often depends on your skill level and the type of work or subjects you photograph.
When photographing products, you likely already know that pricing can vary. Additional charges may apply based on factors like the product’s size, weight, preparation needs, whether it’s a group or single item, or the type of image or print the client requests.
Take a look at what photographers typically charge based on their level of experience:
Beginner level photographers
Beginner photographers, who are just starting out, may charge around $5 per hour. As they gain experience and refine their skills, they can gradually increase their rates, potentially reaching up to $100 per hour.
Mid-level photographer
With gained expertise and experience, mid-level photographers can charge rates starting at $100 per hour and above.
Professional and expert level photographers
Expert-level photographers command significantly higher rates, often starting at $250 per hour. In certain cases, their fees can exceed $500 per hour.
Things to Consider To Set Pricing of Custom Product Photography
Determining the right price for your product photography can be both a complex and challenging task. As a business owner, it’s essential to calculate the appropriate fees that will cover your costs and ensure profitability while meeting your clients’ expectations.
This is about your business, and naturally, you don’t want to end the year at a break-even point. To avoid this, it’s crucial to approach your pricing with care, strategy, and precision. Creating an accurate pricing structure is essential undervaluing your services may lead to losses, while overpricing could drive customers away.
The primary goal of any business is to generate profit. Simply being a photographer won’t ensure success. That’s why it’s essential to consider key factors beyond just your craft, as these elements will influence your pricing structure and overall business strategy.
Review these factors to ensure you’re getting the best value for your investment.
Your Experience
Experience plays a key role in setting your rates. The length of time you’ve worked as a photographer often reflects the level of skill and attention to detail you bring to each project.
Experienced professional photographers have built their reputation through years of work and the knowledge they’ve gained along the way. That’s why it’s important to consider your own experience when setting your rates.
Your expertise
In photography, your knowledge, skill level, and expertise play a major role in determining what you should charge. This holds true for product photography as well. Skilled photographers understand the craft well and often charge above average for their work. On the other hand, mid-level or beginner photographers typically offer more affordable rates.
Your brand
Whether you work as a freelance photographer, in a studio, or have built your own brand, your reputation matters. For example, Karl Taylor is a well-known commercial photographer in the U.S., and Jordan Matter is a popular portrait photographer based in New York City.
You can build a strong reputation in product photography too. Your personal brand plays an important role when it comes to setting your rates. If you’re not widely known yet, don’t worry consistent hard work will lead to recognition and better opportunities in time.
Quality of work
What else do you offer that sets you apart? Quality is a key factor. If an inexperienced photographer charges the same as a seasoned professional, it may come across as unrealistic and damage credibility.
Focus on delivering high-quality work and meeting deadlines. Consistency in both will boost your value and leave a strong impression on clients, helping you justify better pricing for your services.
Product you shoot
Pricing can also vary based on the type of product you’re photographing. Some items are simple to shoot individually, while others require group shots or close attention to detail. Certain products may need multiple angles or extra effort to capture properly, so the number of images needed also affects the final cost.
Location you choose
Location is another important factor in setting your rates. So, have you decided where you’ll be offering your services?
For example, if you’re working in a major city like New York or London, your rates will naturally be higher due to the increased cost of living and business expenses. In contrast, photographers based in more affordable cities like Cardiff or Virginia may charge less, reflecting lower local costs.
Additionally, other factors come into play. Whether you’re shooting indoors or outdoors can influence your pricing, as each setting may require different resources and preparation.
Business costs
Creating a pricing list isn’t always easy. It must also cover your business expenses. Like any other business, photography requires some upfront investment to present a professional and client-friendly image. These are-
Equipment
Equipment costs include the price of your camera, lenses, tripod, lighting, computer, and any repairs or maintenance they may need.
Setup
Setup includes organizing and positioning all the essential equipment needed for the shoot.
Rent
If you don’t have your own space, you’re likely renting a studio, which adds to your monthly expenses. Be sure to include this cost when calculating your overall business expenses.
Charge of other photographers
Planning to hire other photographers to support your work? If so, their pay and related costs should also be factored into your budget.
Travel
Does your work involve outdoor shoots? If clients request outdoor photography, be sure to include any related expenses in your pricing.
Post-production services
If you want to focus more on your photography and maintain a professional workflow, saving time is key. Hiring a skilled photo editor can help you do that, allowing you to dedicate more time to your shoots and client relationships.
It’s a good idea to create a spreadsheet to track all your business expenses. This makes it easier to calculate the total amount you’ve invested in your photography business.
Your competitor
Research your competitor’s pricing structure and the services they offer in exchange for that price. Collect as much relevant information as possible. This insight will not only assist you in determining your own pricing strategy but also help you develop a well-informed plan to stay competitive in the market.
Customers you target
Your buyer persona, or target clients, significantly influences your pricing strategy. For example, some customers are primarily concerned with price, while others prioritize value. Understanding your ideal clients will help you set prices that resonate with their needs and preferences.
- What motivates clients to choose a photographer?
- What specific results are they looking for?
- How can you meet their needs better than others?
- What unique services or value can you offer to stand out?
By addressing questions like these, you will gain a clearer understanding of what differentiates you from other photographers. This insight can help shape your strategy and pricing.
Profit you want
Your efforts should yield results. It’s not only about financial compensation, but the profit also serves as a key motivator to keep moving forward. Determine the profit you aim to achieve and factor that into your plans.
At What Point Should You Reassess Your Product Photography Pricing?
Through my deep involvement in the photography industry, I have gained valuable insight into the nuances that define the business. By analyzing key aspects such as business policies, service offerings, photographer skills, target clientele, and other critical factors, I recommend revisiting and adjusting your product photography rates every 4 to 6 months. This ensures your pricing stays competitive and in sync with market dynamics.
A lot of specialists recommend that new photographers consider their rates often. I wouldn’t advise that. In the beginning, you had better do it 3 or 4 times a year. You can competitively price your services based on your skill level, but increasing your prices without adequate justification will lead to client dissatisfaction. You must reason your service price increases. That would annoy your clients.
If you have a certain reputation or clientele for yourself, have been doing business for quite some time, and have your business nearly matured or have a couple of years of experience in its pocket, then you may need a review but not this frequently.
All of these are optional requirements, really. At no point have you been required to proceed in a particular way, after all. So, given how things are fluid, they may be altered and their alignment dictated when the business grows more mature.
Final Thought
Product photography pricing is not a fixed formula. It’s a strategic decision that evolves with your skills, market demand, and business growth. When your rates are thoughtfully planned, they communicate professionalism, protect your profits, and attract the right clients who value quality over shortcuts. By understanding your costs, refining your value, and reviewing your pricing at the right time, you set a strong foundation for long-term success.
To stay competitive and focused on what you do best, creating impactful product images, partnering with a reliable post-production team can make a real difference.GRASIGNER, a professional photo editing company, helps product photographers and e-commerce brands deliver polished, market-ready visuals while saving time and operational costs. With the right pricing strategy and the right support, you can confidently grow your photography business and position yourself for premium opportunities.
The post How Much Does E-commerce Product Photography Cost in 2026 appeared first on Grasigner .
]]>The post What Is The Standard Image Size for eCommerce? Professional Guide 2026 appeared first on Grasigner .
]]>High-quality visuals play a critical role in influencing buyer confidence. In fact, 90% of shoppers admit that the quality of product imagery directly impacts their purchasing choices, while 30% say they would forgo a purchase altogether if product images are poor or absent.
To effectively showcase your products and maximize conversions, professional imagery is essential. Equally important is understanding how to strategically integrate and optimize these images throughout your Ecommerce store. This comprehensive guide will walk you through everything you need to know from selecting the ideal ecommerce product image sizes and formats to effortlessly resizing your visuals and applying best practices to ensure your product photos captivate and convert.
Why is image size important for ecommerce products?
Your Ecommerce store has various pages, each page featuring images of different sizes. It helps to have the right dimensions to ensure a clean, professional look. Optimizing image sizes not only enhances your store’s visual appeal but also provides customers with clearer product views, creating a more engaging shopping experience and helping turn visitors into loyal buyers.
Here’s top three main reasons why getting the image size right matters:
Improves page loading speed
One of the biggest frustrations in online shopping is slow-loading eCommerce websites. Pages that lag not only waste valuable time but also create a poor browsing experience. In most cases, oversized image files are the primary cause, significantly slowing down product pages and leading to abandoned carts and lost sales. By optimizing your images for the perfect balance between file size and quality. You can ensure faster load times across all devices, improving user experience and boosting conversions.
Boosts user experience
When shopping online, customers rely heavily on product images to connect with what they’re buying. The appearance of your products plays a crucial role in shaping customer perceptions and influences their purchasing decisions. Using the correct image sizes ensures that visuals remain sharp and undistorted, enhancing user experience and enabling smooth, confident navigation throughout your store.
Improves search engine ranking
Achieving a presence on the first page of search engine results is essential for maximizing your business’s online visibility. Every day, billions of users turn to search engines to find answers and products, typically engaging with the top results. Optimizing your image size and quality plays a key role in enhancing site performance, boosting visibility, and driving more traffic to your store.
2026 Platform-Specific Product Image Size Requirements
As eCommerce continues to evolve in 2026, staying updated with the latest product image size requirements is more important than ever. Each major platform updates its guidelines to improve visual quality, page speed, and customer experience. Whether you sell on Amazon, Shopify, social media, or Google Shopping, using the correct image sizes directly impacts visibility, trust, and conversions.
Amazon Product Image Guidelines
Amazon enforces strict product image standards to maintain a clean and professional marketplace.
- Minimum size: 1000 × 1000 pixels (enables basic zoom)
- Recommended size: 1600 × 1600 pixels or larger for sharper zoom
- Maximum size: Up to 10,000 pixels on the longest side
- Supported formats: JPG (preferred), PNG, TIFF, GIF
- Background: Pure white (RGB 255, 255, 255)
- Product coverage: Must fill at least 85% of the image frame
Amazon does not allow watermarks, text, logos, or promotional graphics. Images that fail to meet these standards may cause listing suppression or removal. Following Amazon’s eCommerce product image size guidelines is essential to protect visibility and maximize sales performance.
Shopify and Other eCommerce Platforms
Shopify allows more flexibility but strongly recommends consistent, high-quality product images for the best shopping experience.
- Recommended size: 2048 × 2048 pixels for clear zoom and detail
- Maximum file size: 20MB (under 3MB is ideal for fast loading)
- Aspect ratio: 1:1 (square) for product listings
- Banner sizes: Typically 1200–2500 × 400–600 pixels
Platforms like WooCommerce and BigCommerce follow similar image size standards. Always review the latest platform documentation, as requirements may change. Oversized images can slow your store, while inconsistent sizing can break visual consistency and reduce user trust.
Social Commerce Image Sizes: Instagram, Facebook & Pinterest
Social commerce continues to grow rapidly in 2026, making proper image sizing critical for engagement and ad performance.
- Instagram: 1080 × 1080 pixels (square posts)
- Facebook Shops: Minimum 500 × 500 pixels; 1024 × 1024 pixels recommended
- Pinterest: 1000 × 1500 pixels for vertical pins
Using the correct eCommerce product image size across social platforms helps maintain a strong brand presence, improves engagement, and increases click-through rates. Always preview images before publishing to avoid unwanted cropping or quality loss.
Ecommerce Products image size guidelines (overview)
Three main factors affect the size of images you upload to Ecommerce Products: Site theme, platform limits, and the purpose of your image.
Site theme
While all Shopify themes support image integration into product listings, each theme may have specific image size requirements. Non-compliance with these guidelines can lead to issues such as image cropping or distorted displays. Furthermore, many themes include built-in image optimization tools that help preserve image quality and ensure seamless site performance.
Image requirements E-commerce Store:
- E-commerce Store recommends keeping images within the following specifications:
- Maximum image dimensions: 4472 x 4472 pixels or 20 megapixels
- Best size for square photos: 2048 x 2048 pixels
- Maximum image file size: 20 MB
To enable zoom on product images, make sure they are at least 800 x 800 pixels. Smaller images won’t support zoom.
The platform automatically resizes images that exceed the permitted dimensions to ensure they conform to the specified limits. Additionally, the number of media files you can upload to your store varies depending on your Ecommerce plan. Ecommerce Basic supports up to 250 images, Ecommerce for Small Businesses allows up to 1,000, and Advanced Ecommerce permits up to 5,000 images per product.
Image purpose
The dimensions of your images should align with their intended purpose. Below is a detailed overview of the recommended image sizes for various types of visuals on Shopify eCommerce stores:
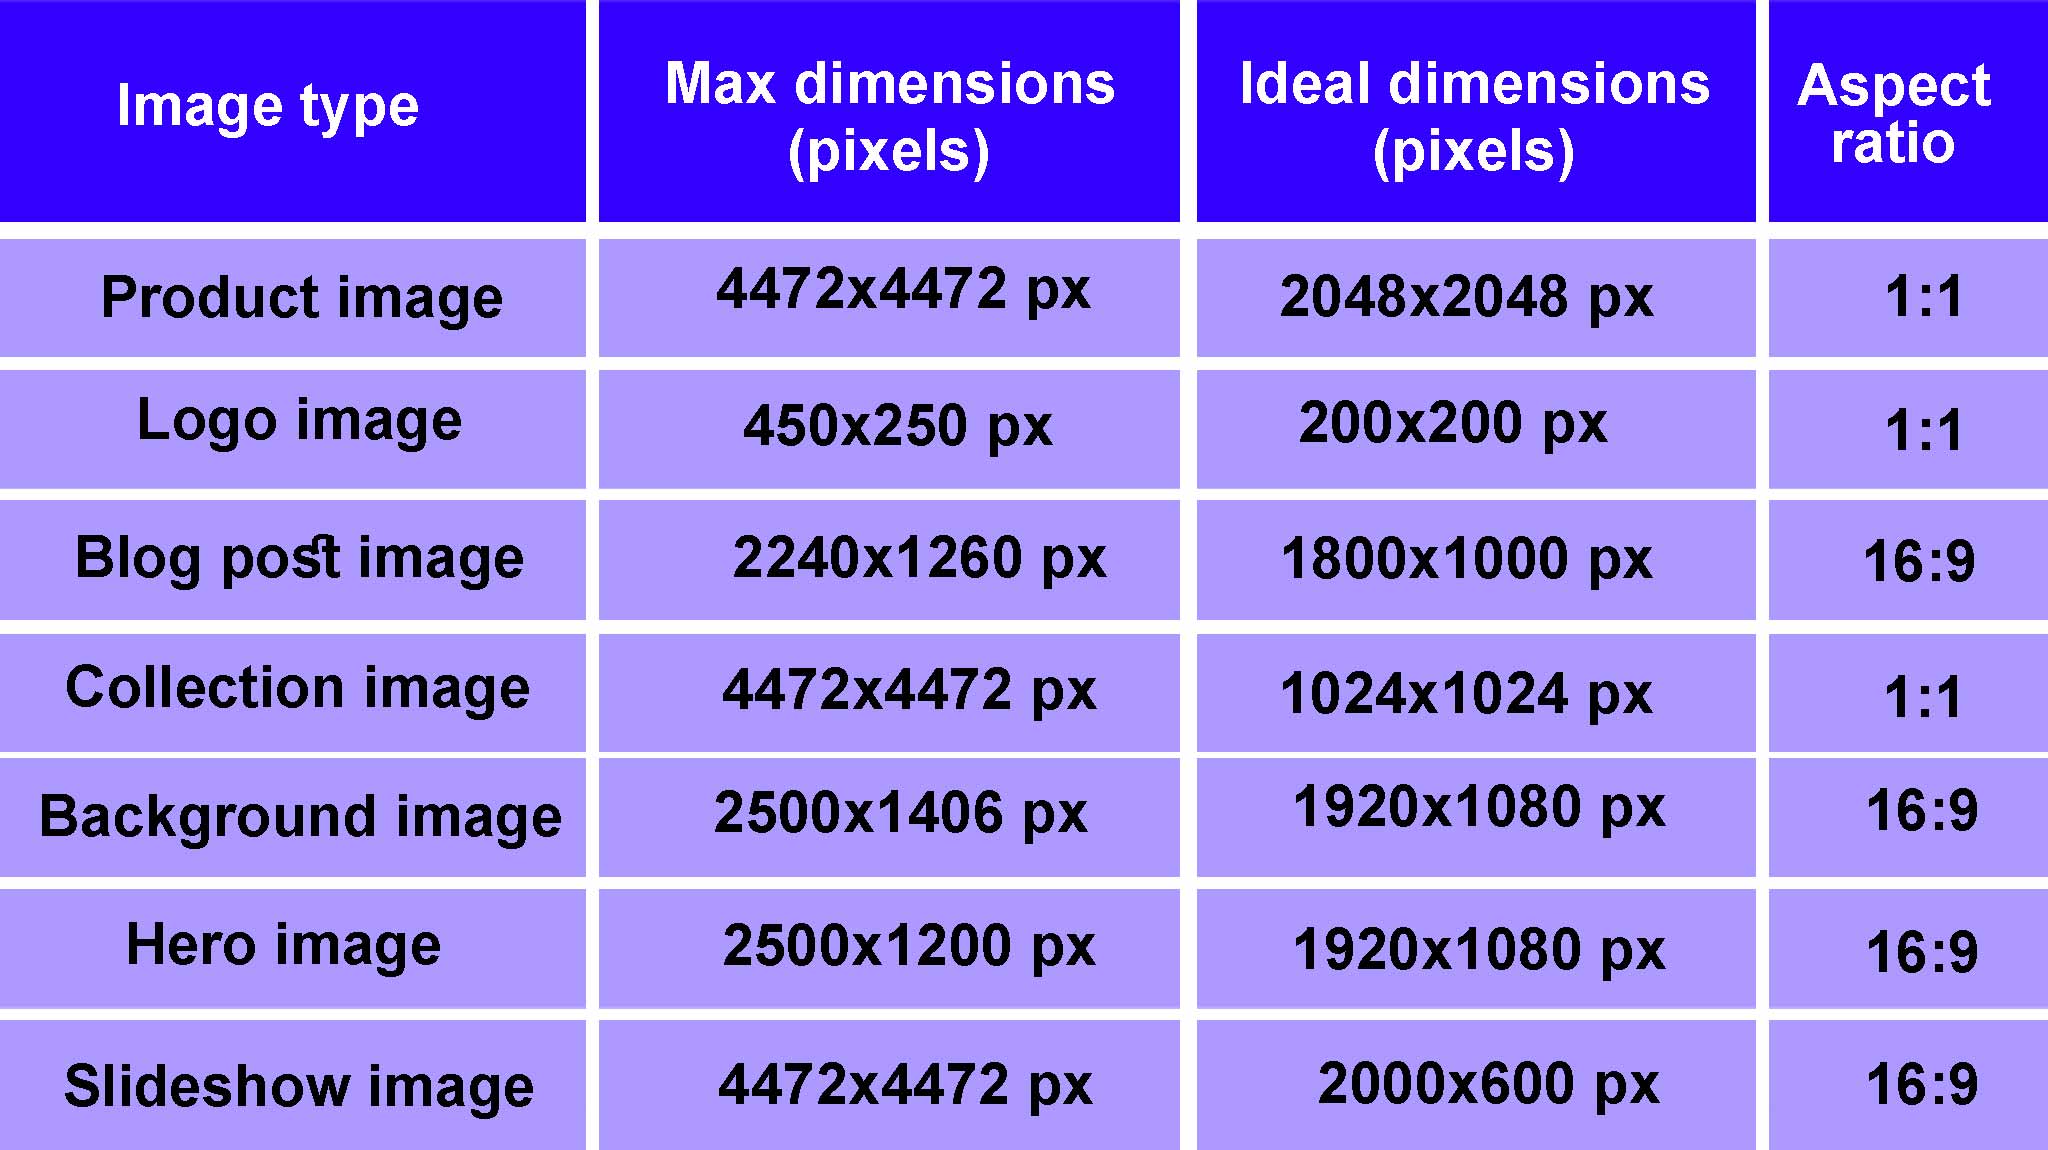
Best Ecommerce Product Image Sizes
Let’s explore the optimal image dimensions for various ecommerce product elements, including product images, blog visuals, collection covers, background graphics, hero sections, slideshows, banners, and logos.
Keep in mind that individual themes may have specific size requirements. To ensure the best visual results and performance. Always consult your theme’s guidelines and specifications.
Ecommerce product image size
When uploading product images to your Ecommerce store, strive for exceptional quality and visual consistency. Providing high-resolution, zoom-capable images allows customers to thoroughly inspect product details, enhancing their online shopping experience and fostering greater confidence in their purchasing decisions.
- Maximum image size: 4472 x 4472 pixels
- Ideal image size: 2048 x 2048 pixels
- Aspect ratio: 1:1 (square images) or 3:1 (rectangular photos)
- Maximum file size: 3 MB
Ecommerce logo image size:
Logo images are typically small-sized, but it plays a vital role in establishing brand identity across your Ecommerce store. As they appear consistently on every page, it’s essential to select dimensions that ensure clarity and scalability across various themes, devices, and screen resolutions.
- Maximum image size: 450 x 250 pixels
- Ideal image size: 200 x 200 pixels (square)
- Aspect ratio: 1:1 (square) and 2:3 or 4:1 (rectangular)
- Maximum file size: 1 MB (ideally smaller)
The Tofino Soap Company employs a clean, text-based logo positioned centrally on their website, presented within a rectangular aspect ratio.
Ecommerce blog image size:
Blog images are typically two categories: featured images and inline images within the blog content. Their dimensions may vary depending on your theme and the visual impact you wish to achieve.
Inline images should align seamlessly with the blog’s text column, commonly around 600 pixels in width. While maintaining moderate aspect ratios to avoid overshadowing the content. Featured images, displayed as thumbnails or headers, should be uniform in size across all posts to maintain a cohesive, visually consistent blog experience.
Here are the featured image guidelines for blog posts are as follows:
- Maximum image size: 2240 x 1260 pixels (width x height)
- Ideal image size: 1800 x 1000 pixels (1.8:1 aspect ratio)
- Aspect ratio: 16:9
- Maximum file size: 3 MB
Ecommerce collection image size
Collection images serve as visual gateways to product categories, offering customers an immediate glimpse into the range of items within each group. These images enhance navigation, helping shoppers quickly identify and explore products that align with their interests.
- Maximum image size: 4472 x 4472 pixels
- Ideal image size: 1024 x 1024 pixels
- Aspect ratio: 1:1 (Square)
- Maximum file size: 20 MB
Ecommerce banner image size
Banner images vary in size and format, tailored to your specific requirements and website layout. Typically featured in promotional sections across your store, they play a key role in capturing attention. As a leading authority in digital advertising, Google recommends the following banner sizes for optimal performance on your site:
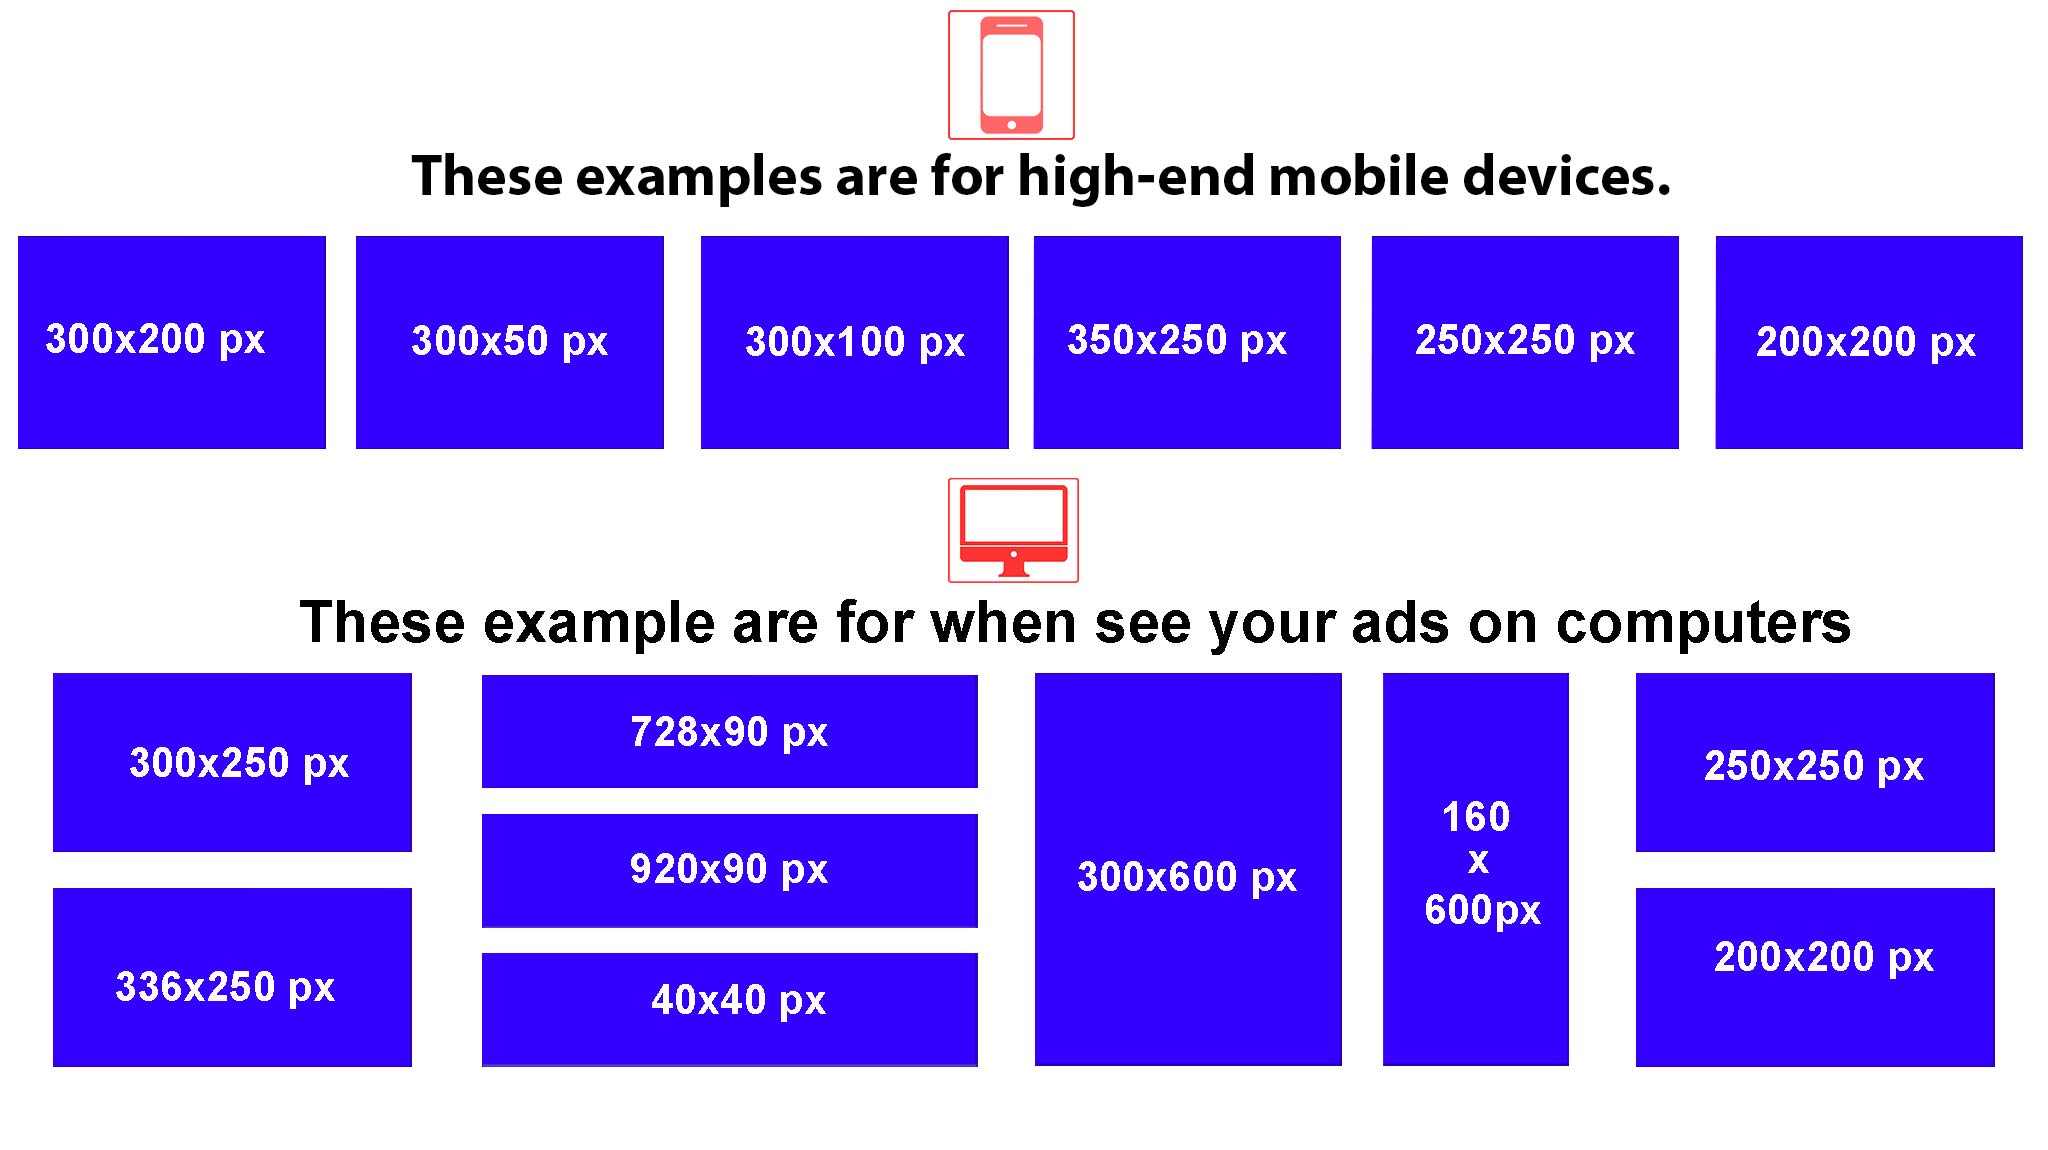
Ecommerce background images
When choosing or designing your background image, prioritize simplicity and clarity to ensure a seamless user experience. Ecommerce platforms typically resize background images for smaller screens, meaning the image may appear differently across various devices.
- Maximum image size: 2500 x 1406 pixels
- Ideal image size: 1920 x 1080 pixels
- Aspect ratio: 16:9
- Maximum file size: 20 MB
Ecommerce hero image size
Hero images are prominent, visually striking images featured at the top of your homepage. Often referred to as non-ad banners, they are sometimes confused with background images. However, the key distinction is that hero images are generally shorter, typically about half the height of a background image. Designed to adapt to various screen sizes, hero images should be optimized for the largest screen resolution (1920 x 1080 pixels for desktop) to ensure crisp, high-quality visuals across all devices.
- Maximum image size: Between 1280-2500 pixels (width) and 720-1200 pixels (height)
- Ideal image size: 1920 x 1080 pixels
- Aspect ratio: 16:9 (landscape orientation)
- Maximum file size: 10 MB
Ecommerce slideshow image size
Slideshow images cycle through a series of visuals and are typically featured on the homepage or product pages. To maintain design cohesion and visual appeal, ensure all images in the slideshow share consistent dimensions or aspect ratios.
- Maximum image size: 4472 x 4472 pixels
- Ideal image size: 1200-2000 pixels (width) x 400-600 pixels (height)
- Aspect ratio: 16:19 (Adjust to either fill the above-the-fold space or allow other sections to appear below the slideshow without scrolling)
- Maximum file size: 20 MB
How to prepare and edit your images for Ecommerce Products
Excellence in product photography is a cornerstone of successful e-commerce. High-quality, authentic images not only elevate the perceived value of your products but also attract your ideal customers, turning them into loyal advocates for your brand. This, in turn, drives revenue growth and fosters a reputable business presence.
To improve the effectiveness and impact of your product images, invest time in both capturing clear, high-resolution photos and utilizing AI-driven editing tools for refinement before uploading to your Ecommerce store.
Take clear product pictures
When capturing your product photos, follow these expert tips for better results:
- Use natural light or invest in a professional lighting kit to capture more captivating shots.
- Clean your camera lens to eliminate blurry images.
- Keep the product in sharp focus to enhance image clarity and highlight fine details.
- Use a tripod to stabilize your camera and minimize motion blur for consistently crisp photos.
- Capture multiple angles to provide editing flexibility and a more complete visual representation of the product.
- Set your camera or smartphone to high resolution to ensure maximum image quality, enabling greater detail and sharper results.
It’s important to keep in mind that higher-resolution images typically result in larger file sizes, which can impact your website’s loading speed. To balance image quality with performance, consider the following optimization strategies:
- Follow Shopify’s recommended image dimensions to ensure proper display and alignment across your store’s layout and devices.
- Conduct A/B testing to identify the optimal balance between image quality and file size, tailored to your target audience’s preferences and behavior.
- Leverage AI-powered compression and optimization tools to minimize file sizes while preserving visual quality, improve site performance without compromising aesthetics.
Ecommerce product image size FAQ
What is the best size for product images on Ecommerce Store?
For optimal clarity and functionality, Ecommerce store recommends using square product images sized at 2048 x 2048 pixels. Image dimensions should not exceed 4472 x 4472 pixels and should remain above 800 x 800 pixels to retain the zoom feature. It’s also important to note that different image types across your store.
Why are my ecommerce product images blurry on mobile?
If your Shopify images appear blurry on mobile devices, it’s likely because you uploaded them at low resolution. To maintain visual clarity, ensure your product images fall within the recommended range of up to 4472 x 4472 pixels. Additionally, be mindful that some themes may have specific image size requirements. So it’s essential to review and follow your theme’s design guidelines for optimal results.
What is the best file size for optimum speed on an Ecommerce Product?
To ensure faster page loading and optimal site performance, it’s recommended to keep image file sizes within Shopify’s 20 MB limit. So, use image compression and optimization tools to effectively balance visual quality with manageable file sizes.
Why are my product images different sizes on Ecommerce stores?
The sizes of your images dimensions can cause visual discrepancies across your store. To maintain a cohesive appearance, resize or crop your images to a uniform set of dimensions before uploading. Also, check your theme settings to determine if automatic resizing is applied, and make any necessary adjustments to ensure optimal presentation.
The post What Is The Standard Image Size for eCommerce? Professional Guide 2026 appeared first on Grasigner .
]]>The post How to Build Flat Lay Product Photography? Make Your Products Pop! appeared first on Grasigner .
]]>This article will help you capture the right flat lay product photography with ideas & tips, and a setup guide creative insights needed to produce stunning flat lays that not only elevate your brand’s visual identity but also enhance your storytelling impact.
What is flat lay product photography?
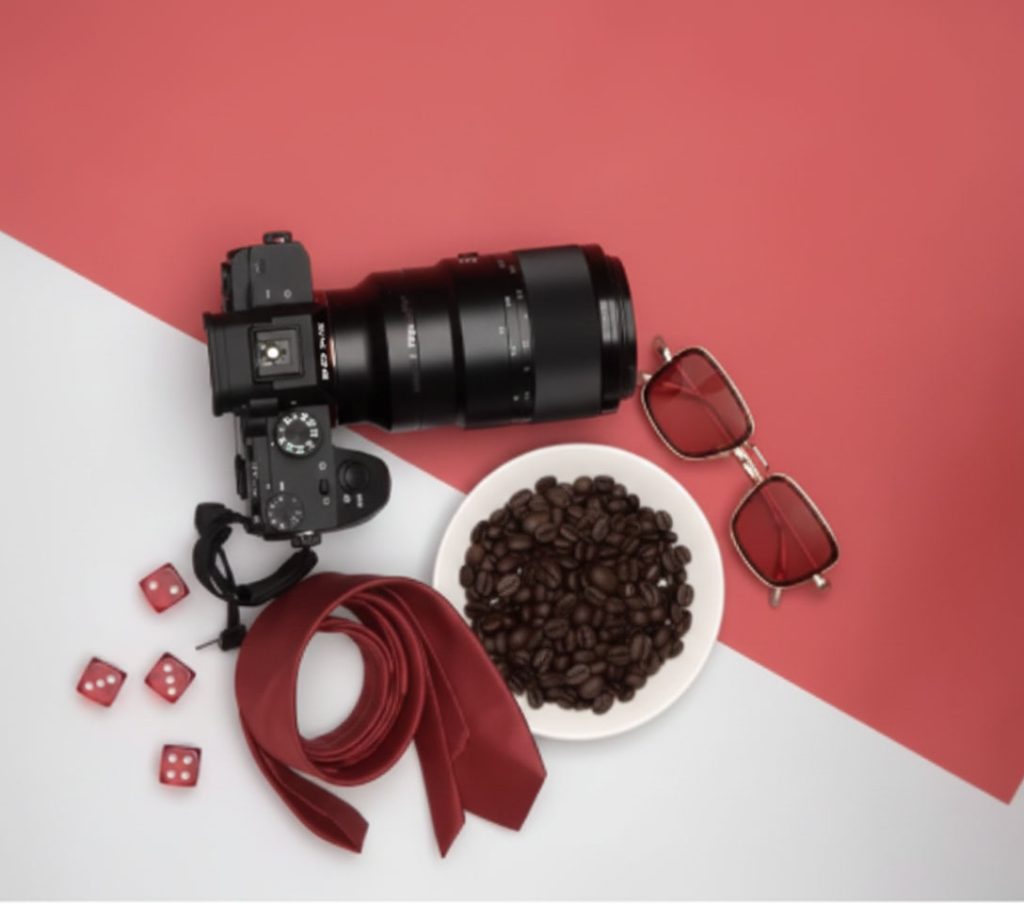
Flat lay product photography has become a popular trend of modern visual marketing. This technique involves arranging products on a flat surface and photographing them from above. This approach to photography allows for creative compositions that highlight both individual details and the overall visual harmony.
You can create professional images that highlight the product features in a compelling and memorable way by using backgrounds, thoughtful props, and strategic lighting technique. Flat lays enable brands to craft visually rich images that emphasize product features in a compelling and memorable way. This style is particularly effective for showcasing design-driven items like jewelry, watches, fragrances, and cosmetics products.
Flat lay product photography is a fresh and engaging way to visualize your products to customers. Flat lay photography offers a dynamic and immersive alternative to traditional product shots. It evokes emotion, tells a story, and invites customers to envision your products as part of their daily life and make deep brand connections.
Benefits of Flat Lay Product Photography
Flat lay photography is more than a trend, it’s a creative language that has stood the test of time. By capturing products from a bird’s-eye view, this technique offers a fresh perspective that blends clarity with storytelling. Curious about the specific benefits? Let’s get started:
Display product details
Flat lay photography presents products in a clean, unobstructed top-down view, allowing every detail to be clearly visible by placing items on a flat surface and eliminating background distractions. This technique offers viewers a focused, comprehensive perspective ideal for showcasing features up close and with maximum clarity.
Show additional items
One of the standout advantages of flat lay photography is its ability to showcase complementary or related products alongside the primary item. This visual context not only enhances the overall composition but also helps communicate the product’s purpose, potential uses. How it fits within a broader collection guiding viewers toward a deeper understanding of its value and versatility.
Depict a story
Flat lay photography offers a powerful opportunity to craft visual narratives through thoughtful prop styling. By incorporating complementary items such as pairing a clothing piece with a hat or bag. You can evoke specific lifestyles or scenarios, helping viewers imagine how the product fits seamlessly into their daily lives or personal style.
Build trust among viewers
High-quality imagery that captures your product from multiple angles reinforces trust and transparency in the viewer’s mind. As a result, it offers a clear, detailed visual representation and provides assurance about what they’re purchasing, reducing uncertainty and encouraging engagement by showcasing exactly what they can expect.
Increase engagement & traffic
Flat lay product photography is visually compelling, combining overhead composition with storytelling to present items in their most flattering form. When shared online especially in zoomable formats these striking visuals capture attention and invite closer inspection. The result is heightened viewer interest and increased engagement, particularly from detail-oriented, enthusiastic customers.
Does the ecommerce Business Need Flat-Lay Photography?
Among the various styles of photography, flat lay stands out as one of the most practical and visually effective, especially within the fast-evolving world of e-commerce. Its growing popularity in online retail is no coincidence. If you’re wondering why flat lay photography is worth considering, understanding its distinct advantages will provide a clear and compelling answer.
Eye-catching
Flat lay product photography places the spotlight entirely on the apparel, using a clean, minimalistic approach that draws immediate attention. This straightforward style not only enhances visual appeal but also makes the imagery more relatable and engaging for potential customers. By clearly showcasing the texture, fit, and fine details of each piece, flat lays help convey authenticity and build trust in your brand.
Organized presentation
Flat lay photography allows for effortless organization and presentation of product, ensuring each item is displayed with clarity and precision. With its use of clean, minimal backgrounds, this style eliminates visual clutter, keeping the focus solely on the product. The result is a polished, distraction-free image that offers a visually satisfying experience for potential customers.
Social media friendly
Social media thrives on visually captivating content, making it the perfect platform to showcase flat lay photography. This style provides endless creative, unique, and aesthetic visuals. With a single glance, potential customers gain a clear impression of your products. Which may persuade them to explore your website and to look for more products.
Multipurpose use
The clean, versatile aesthetic of flat lay photography makes it an ideal choice for a wide range of applications. Beyond social media, these visually striking images can elevate blog content, enhance website visuals, and serve as dynamic cover photos for business pages. Their simplicity allows for easy resizing and repurposing across platforms without compromising visual impact.
Cost-effective
Flat-lay product photography setup requires minimal preparation. A flat just a surface, good lighting, and a smartphone are enough to create clean, eye-catching visuals. Most importantly, no need for elaborate setups or professional photographers. Even using a smartphone is a pro setup.
Get Started With Flat Lay Product Photography
To achieve high-quality flat-lay product photos, it’s essential to follow key best practices that enhance visual appeal and showcase your product at its finest.
1. Table for Flat Lay Apparel Photography
A backlit table is an excellent tool for flat lay product photography. Its design allows for secure camera mounting, ensuring consistent top-down shots. Besides, the adjustable side lighting provides balanced illumination perfect for minimizing shadows and enhancing product details.
2. Camera for Flat Lay Photography
Your camera settings primarily influence the quality of your photographs. To achieve optimal results, ensure the following settings are configured correctly for the best possible image quality:
ISO: The clarity of your photographs plays a crucial role in capturing customer attention. To minimize noise and grain, set your ISO to 100-200.
Aperture: When it comes to aperture, aim for a balanced setting. Extremely high apertures, such as f/22 or f/32, can result in a loss of sharpness and clarity. To maintain crisp, detailed images, keep your aperture between f/8 and f/16, with f/11 being the ideal choice for optimal sharpness across your composition.
Focal Length: For flat-lay photography, virtually any lens can work, except for wide-angle lenses. To achieve the best results, it’s recommended to use a focal length of 50mm or higher. Lenses with a shorter focal length can introduce unwanted distortion and widen the frame, compromising image quality.
Shutter Speed: Shutter speed is mostly influenced by aperture and ISO settings. By setting your camera to aperture priority mode, you allow it to automatically adjust the shutter speed based on the available lighting, ensuring optimal exposure in varying conditions.
3. Background for Flat Lay Photography
Make the product remains the focal point in flat lay photography. It is ideal to use a simple, monochromatic background, such as white or gray. Contrasting colors can also be employed to enhance the product’s prominence.
For example, when photographing darker-colored cloth, then the background should have a lighter color. Conversely, for brighter clothing, darker backgrounds such as black, navy, or charcoal are more suitable. Using color palettes can also help in selecting complementary tones that improve the overall composition.
4. Lighting for Flat Lay Photography
Effective lighting is crucial in flat lay photography to bring life and depth to your product. Lighting from a high angle can flatten the appearance of products, making them look lifeless. To add a subtle 3D effect, it’s best to position your lights at a lower angle.
For optimal results, a 45° light angle is highly recommended. This positioning creates natural shadows, enhances the texture of the clothing, and adds depth, giving your images a more dynamic and dimensional quality.
5. Photographing the Clothing Product
Central composition
For a product-focused approach, central composition is the ideal technique. Simply position the clothing at the center of the frame to create a clean, balanced image. This method eliminates the need for additional elements, allowing the product to remain the sole point of interest without unnecessary distractions.
Rule of thirds
If a central composition feels too static or predictable, applying the rule of thirds can add visual interest. Position your product on either the left or right third of the frame, allowing the remaining two-thirds to remain open. This technique creates a more dynamic and engaging composition while still keeping the focus firmly on the product.
How to Edit Flat Lay Product Photography?
Capturing the perfect shot is only half the journey, thoughtful post-processing is equally essential. Photo editing plays a crucial role in correcting colors, adjusting lighting, and eliminating imperfections that can ruin the overall impact and professionalism of your images.
1. Edit Your Own Product Photos
Photographs often require post-processing to address issues like cropping, straightening, color correction, and more. Fortunately, with a wide range of user-friendly editing software and countless step-by-step tutorials readily available, enhancing your images has never been easier or more accessible.
2. Outsource Apparel Photo Editing
If editing your photographs feels overwhelming, consider outsourcing to a professional apparel photo editing company. Experienced editors can refine your images according to your specific needs, allowing you to simply invest in their services and enjoy peace of mind knowing your visuals are in expert hands.
Flat Lay Product Photography Ideas and Tips
Knowing a few tips and tricks will certainly come in handy while doing visual appeal of your flat-lay product photography.
1. Be Creative
Creativity is the most important factor that will distinguish your photographs from the rest. Begin by mounting your camera on a flat-lay tripod and carefully analyzing the composition. Strategically position the product within the frame to highlight its features and convey as much detail as possible.
2. Layering Clothes
To achieve a natural, lifelike presentation of clothing, consider creating a ghost mannequin effect. Arrange the garments as they would naturally appear when worn, for instance, layer a top beneath a jacket and add subtle folds to the sleeves to improve realism and dimension.
3. Proper Styling to Show Details
Capturing long or multiple products within a limited frame for flat-lay fashion photography can be challenging. Since showcasing key details is essential. It’s crucial to experiment thoughtfully with positioning.
Strategically folding clothing can highlight distinctive features, such as prints, patterns, necklines, sleeve lengths, or other unique elements that resonate with potential customers.
4. Provide Styling Ideas
Improve your product photography by keeping the complementary items alongside your product to offer styling ideas for potential customers. For example, placing the featured product with accessories such as sunglasses, footwear, or jewelry can provide a clear visual of how it can be styled, adding value and encouraging purchase decisions.
5. Sharpen the image
A blurry image fails to make a strong impression, particularly in flat lay photography, where clarity and vibrancy are key. To achieve sharp, striking images, it’s essential to eliminate excess noise and enhance focus.
Applying selective sharpening can improve the clarity of softer edges without compromising the overall aesthetic. However, it’s important to avoid over-sharpening, as this can result in undesirable halos around objects, which detracts from the image’s quality.
6. Retouch and remove imperfections
At this stage, it’s essential to complete any final edits to perfect your image. Ensure the composition is properly aligned and eliminate any distracting elements to maintain a clean, polished look.
If you prefer focusing on photography rather than post-production, consider partnering with the experts at Grasigner. Our professional retouching services can seamlessly remove imperfections, reflections, blemishes, and more all at competitive prices with fast turnaround times. Explore our full range of editing solutions to elevate your visuals with ease.
7. Add shadows
Shadows and lighting most important enhancing the visual impact of flat-lay product photography. Ideally, it’s best to capture during the shoot, however, lighting conditions are not always perfect, adding shadows would improve the composition.
Fortunately, realistic shadows, such as drop shadows can be seamlessly introduced during post-processing to bring greater depth and authenticity to your images.
If creating natural-looking shadows isn’t within your editing expertise or time constraints, the professionals at Gragigner are here to help. Our experts specialize in adding realistic drop shadows, giving your flat-lay product photos a polished, lifelike appearance.
Achieving Excellence in Flat-Lay Product Photography
A bird’s eye view can be the ideal angle to showcase your products with clarity and style. The beauty of flat-lay photography lies in its accessibility.
Keep your focus on the product and the story your brand aims to tell. This narrative will serve as a guide during the creative process, helping you experiment with layout, composition, and styling.
Most importantly, enjoy the process. Flat-lay product photography offers a unique opportunity to blend creativity with storytelling, making it both a practical and rewarding way to present your products.
Final Thoughts
Flat lay product photography is more than just a visual trend—it’s a powerful way to present your products with clarity, creativity, and purpose. With the right setup, thoughtful styling, and proper lighting, flat lays can turn simple products into eye-catching visuals that tell a strong brand story and inspire customer trust.
While capturing a great flat lay is achievable, perfecting it often comes down to expert editing. That’s where GRASIGNER makes the difference. As a professional image editing agency, we help brands enhance flat-lay photos with clean retouching, accurate colors, realistic shadows, and a polished finish ready for eCommerce and marketing use.
Whether you edit in-house or outsource to professionals, consistency and quality should always come first. Let GRASIGNER handle the editing, so you can focus on creating, selling, and growing your brand with confidence.
The post How to Build Flat Lay Product Photography? Make Your Products Pop! appeared first on Grasigner .
]]>