Reflective product photography presents unique challenges. That goes beyond simply using a high-quality camera and a shiny product to make consumers swoon. Success in this field requires a solid grasp of the principles of reflection, mastery of specialized techniques, and the use of carefully selected equipment tailored to the subject.
Fortunately, this comprehensive guide to reflective product photography equips you with the skills and insights needed to create compelling products. Let’s start:
What is Reflection Products Photography?
Reflective product photography is a specialized discipline within commercial photography, dedicated to showcasing items with highly reflective surfaces such as cosmetics, glassware, Jewelry, electronics, and other intricate products.
The primary challenge lies in managing the interplay between light and surface, as reflective materials tend to produce glare, hotspots, and unwanted distortions that can detract from the product’s actual appearance.
Achieving high-quality results demands a refined approach, carefully controlled lighting setups, thoughtful composition, and meticulous post-processing. All techniques highlight the product’s design without compromising visual clarity.
Understanding the Law of Reflection in Product Photography
At the core of reflective product photography lies a foundational principle of physics: the law of reflection, which states that the angle of incidence (where light strikes a surface) equals the angle of reflection (where light bounces off).
This fundamental can either work for you or against you in reflective product photography. When managed correctly, it enhances the image with striking clarity and depth. So, understand the lighting angle and adjust accordingly.
If your lighting is not adjusted correctly, reflections can distort the image and degrade its quality.
How do shine and reflections affect product photography
The appeal of reflective products stems from their natural ability to catch light, creating a sense of depth, dimension, and sophistication.
Yet, this reflective quality can be a double-edged sword. At the same time, it adds visual intrigue and introduces challenges such as glare, hotspots, and distracting reflections that can obscure key product details.
Mastering reflective product photography requires striking a careful balance: skillfully harnessing light to enhance the product’s visual appeal while strategically minimizing elements that detract from its presentation.
Unwanted Reflection Off A Shiny Surface of a Product
Here, the products are more prone to unwanted reflections than others. These include:
- Shiny metal products, such as Jewelry, watches, and electronics.
- High-gloss products, like luxury cars, furniture, and appliances.
- Glass and translucent products, like bottles, cosmetics, and pharmaceuticals.
- Polished stone and marble products, like countertops, sinks, and decorative items.
- Metallic products, such as bicycles, motorcycles, and sports equipment.
- Chrome and stainless steel products, such as kitchen appliances, bathroom fixtures, and consumer electronics.
- Electronics with shiny screens, like smartphones, tablets, and laptops.
- Automotive parts such as wheels, rims, and body kits.
- Mirrored or reflective surfaces, like mirrors, sunglasses, and watches.
- Furniture with chrome or metallic legs, like coffee tables, chairs, and desks.
- Shiny plastics and resins are found in toys, gadgets, and various consumer goods.
- Jewelry with intricate details, like engagement rings, earrings, and pendants.
- Home decoration items, like picture frames, vases, and decorative accents with reflective surfaces.
- Luxury fashion items, like handbags, shoes, and accessories with metallic or shiny finishes.
How Do You Set Up Lighting For Shiny Or Reflective Products
Begin by setting up a well-organized studio environment and ensuring all essential tools are within reach. Here’s a more detailed breakdown:
- Unwanted reflections from surrounding lights, colors, people, or objects in the studio setup.
- Harsh lighting that distorts the product’s appearance or alters its true color.
- Obstructed or blurred details, such as labels or fine elements, caused by glare or overexposure.
- Surface imperfections like smudges, fingerprints, or scratches that become highly visible under reflective conditions.
1. Clean and Organized Studio Space:
Remove Clutter: Minimize background distractions to avoid unwanted reflections.
Clean Surfaces: Wipe down the shooting surface to remove dust or debris that could be picked up by the reflective product.
Arrange Backdrops: Choose a backdrop that minimizes reflections, such as a neutral-colored cloth or paper.
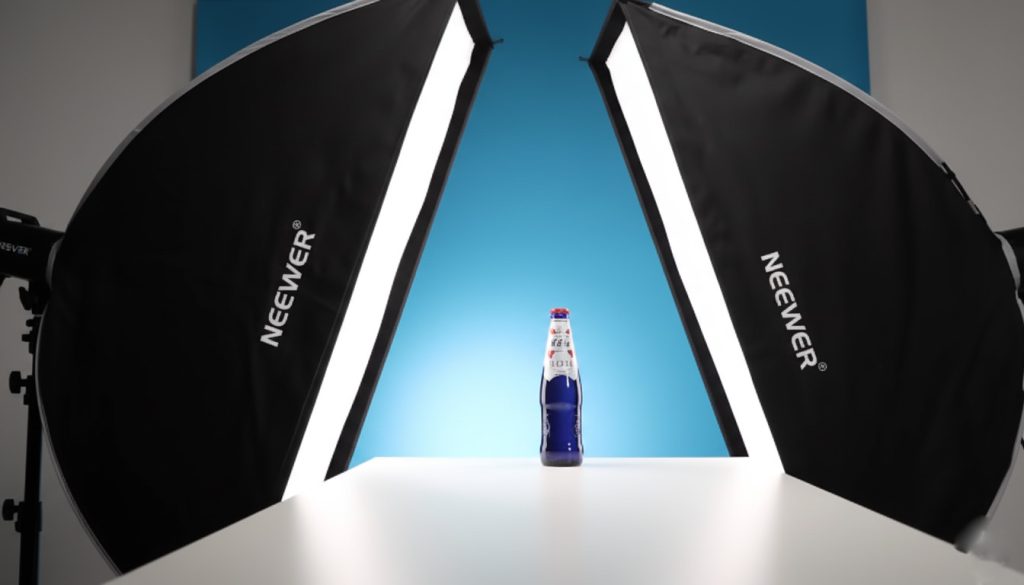
2. Lighting Setup:
Soft, Diffused Light: Use softboxes, diffusers, or umbrellas to soften the light source and reduce glare.
Angle the Light: Position light sources at an angle to avoid direct reflections bouncing back to the camera.
Consider Multiple Light Sources: Using two soft, diffused lights on either side of the product can reduce harsh reflections and create more even lighting.
Polarizing Filters: Use polarizing filters or circular polarizers to reduce glare and reflections on shiny surfaces, such as Jewelry or metal.
3. Product Preparation:
Dulling Spray: Consider using a dulling spray to reduce reflectivity and create a more matte finish.
Surface Preparation: Clean the product to remove smudges, fingerprints, and scratches.
Angle Adjustment: Experiment with different shooting angles to minimize unwanted reflections.
4. Camera Settings and Techniques:
Tripod: Use a tripod for stability, especially when shooting in low light or when fine-tuning angles.
Camera Settings: Adjust aperture and shutter speed to achieve the desired exposure and depth of field.
Post-Processing: Be prepared to use editing software to remove unwanted reflections or correct color casts.
How to Photoshoot Highly Reflective Products
Capturing reflective products requires a refined set of specialized techniques, each carefully tailored to address the distinct visual characteristics and challenges of different materials.
Whether it’s the glossy sheen of cosmetics, the complex refractions found in glassware, or the sleek finish of electronic devices, every reflective surface requires a thoughtful, tailored approach to showcase its features effectively.
In this guide, we’ll explore essential techniques designed to help you confidently photograph a wide range of reflective products, ensuring each item is presented with clarity, depth, and visual impact.
Cosmetic and Beauty Products Photography
Cosmetic and beauty product photography focuses on creating visually compelling images that showcase a product’s key features and enhance its aesthetic appeal. This involves careful attention to lighting, composition, and styling to communicate the product’s essence, evoke emotion, and attract potential buyers.
Essential Techniques for Photographing Reflective Cosmetic and Beauty Products:
Use Soft, Diffused Lighting: Opt for light modifiers like softboxes or diffusers to achieve gentle, even illumination. This helps minimize harsh shadows and reduce distracting reflections, allowing the product’s finish to shine naturally.
Position Reflectors with Precision: Strategically placed reflectors can enhance the lighting setup by filling in shadows, softening contrasts, and ensuring a balanced, professional look.
Highlight Fine Details Through Composition: Focus on showcasing textures, finishes, and intricate packaging elements. Utilize macro lenses and shallow depth of field to isolate these features and draw attention to the product’s craftsmanship.
Maintain a Pristine Surface: Thoroughly clean each product before shooting. Even minor smudges, dust, or fingerprints can become highly visible under reflective lighting and detract from the overall image quality.
Incorporate Subtle Color Grading: Use refined color grading to unify tones and enhance visual appeal. A cohesive color palette can elevate the final image and reinforce the product’s brand identity.
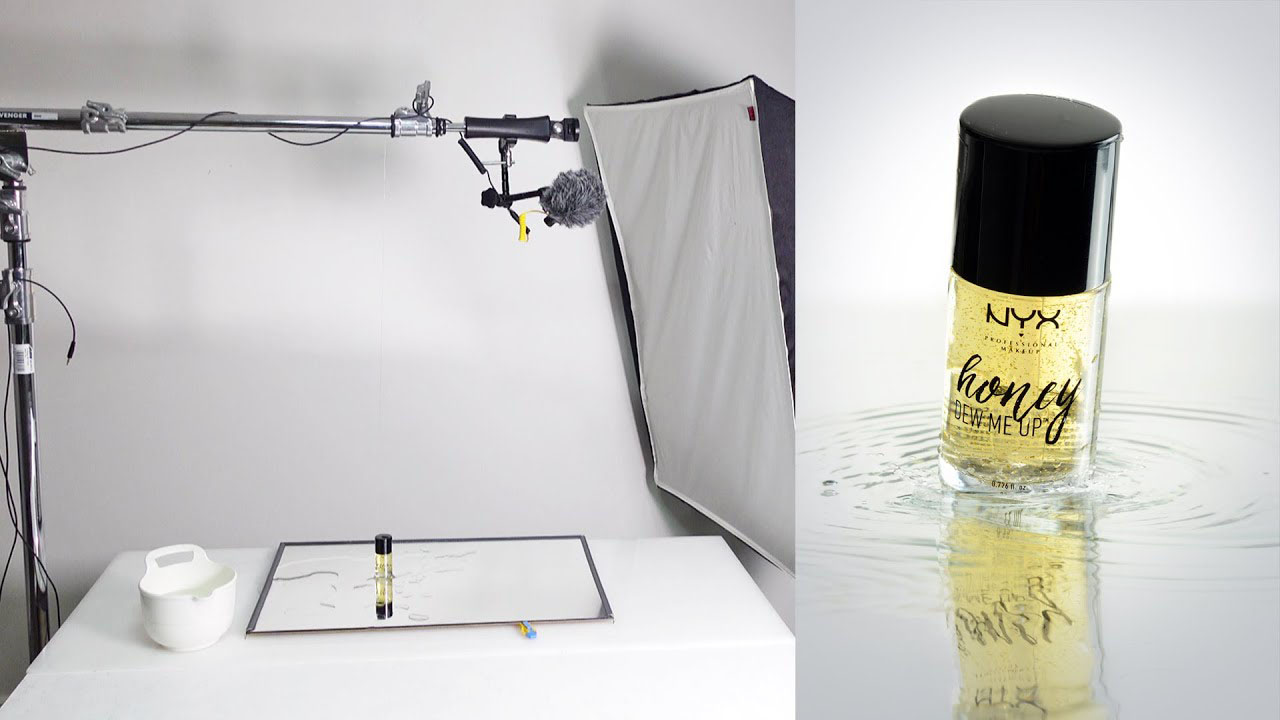
Glass, Bottles, and Translucent Products Photography
Photographing glass, bottles, and other translucent products introduces distinct challenges in reflective product photography.
These materials interact with light in intricate ways, producing complex refractions, subtle distortions, and layered reflections that demand precision and creativity.
Key Techniques for Photographing Translucent Products Like Glass and Bottles:
Utilize Backlighting for Definition: Positioning a light source behind the product accentuates its transparency and refractive properties, revealing elegant contours and internal details while creating a dramatic, illuminated silhouette.
Incorporate Reflective Elements Creatively: Use mirrors or reflective surfaces to introduce abstract reflections that enhance the visual complexity and complement the product’s form and finish.
Manage Glare and Hotspots with Precision: Avoid unwanted reflections by adjusting your lighting angles, employing polarizing filters, and refining your shooting position to reduce surface glare and preserve clarity.
Control Focus with Depth of Field: Apply a shallow depth of field to highlight key product features while blurring the background into a soft, aesthetically pleasing blur that doesn’t compete for attention.
Explore Dynamic Angles: Break from conventional viewpoints by shooting from above, below, or at an angle, revealing unique perspectives that add intrigue and depth to the composition.
Curate Artistic Prop Styling: Thoughtfully chosen props and complementary styling can help craft a cohesive visual story, elevating the product’s presence while reinforcing its brand identity.
Jewelry, Sunglasses, and Detailed Items Photography
Jewelry, sunglasses, and other detailed reflective products present a distinctive challenge in product photography. Their intricate designs, delicate materials, and mirror-like surfaces demand a highly controlled and nuanced approach to accurately showcase their elegance, texture, and brilliance without visual effect.
Essential Techniques for Capturing Jewelry, Sunglasses, and Other Reflective Detail-Rich Products:
Use Macro Lenses for Precision: Macro lenses enable extreme close-ups, revealing the delicate textures, cuts, and craftsmanship that define high-end Jewelry and accessories.
Implement Controlled, Focused Lighting: Directional lighting, paired with strategic reflectors, helps sculpt the product’s shape, emphasize shine, and create a sense of dimension.
Apply Selective Focus Thoughtfully: Utilize a shallow depth of field to isolate key features, such as gemstones, engravings, or branding, guiding the viewer’s eye to what matters most.
Eliminate Unwanted Reflections: Carefully manage lighting angles, camera positioning, and use polarizing filters to reduce visual distractions and preserve clarity.
Experiment with Creative Composition: Think beyond standard shots, explore unconventional angles, asymmetrical framing, and dynamic perspectives to create standout imagery.
Prioritize Product Preparation: Clean every surface meticulously to ensure a flawless presentation; minor blemishes, fingerprints, or dust can undermine the image’s quality.
Refine with Advanced Post-Processing: Use professional editing techniques to enhance reflective elements, balance exposure, and polish the final image for a high-end, commercial finish.
Editing Your Reflective Product Photography
Even with the techniques you use for photoshoots, reflective product photography often results in minor imperfections, such as subtle glare, unintended reflections, or lighting inconsistencies.
That’s why post-production is just as critical as the photography itself. For flawless, high-converting visuals, partnering with a professional eCommerce image editing service can be a wise investment.
However, if you choose to handle the edits yourself, here are some essential post-processing techniques to edit your reflective product images:
Color correction and grading
Begin by adjusting the color palette to ensure the product’s true colors are displayed. Accurate color representation is especially vital for reflective surfaces, where lighting can easily distort tones.
Next, apply a subtle color grade to enhance the image’s overall mood and visual appeal. Keep the grading refined and understated enough to enrich the aesthetic without overdoing it in the product itself.
Retouching and imperfection removal
Use advanced retouching tools in Photoshop, such as the Clone Stamp and Healing Brush, to effectively remove blemishes, dust, and scratches, ensuring a polished, professional appearance.
However, apply these techniques with restraint. Over-retouching can strip the image of an unnatural, overly processed look.
Dodging and burning
Apply selective dodging and burning techniques to enhance highlights and deepen shadows with precision. This method adds depth and dimension to the image, accentuating the product’s form and texture. When used thoughtfully, it will help draw the viewer’s attention to the product.
Noise reduction and sharpening
Starting with noise reduction to remove unwanted grain and digital artifacts, resulting in a smoother, more refined image. Follow this with selective sharpening to enhance key textures and intricate details of the product. Striking a careful balance between clarity and cleanliness without introducing visual distortions.
Reflection and glare correction
Use advanced editing tools, such as Gradient Filters and Local Adjustment brushes, to precisely correct unwanted reflections and glare introduced during the shoot. These targeted refinements help restore visual balance and ensure the final image presents the product with clarity, realism, and polished appeal.
Edit Your Product Photography Like A Pro
Achieving flawless product images directly from the camera isn’t always feasible. Often, imperfections only become apparent once the photo is viewed on a larger screen, or you may anticipate specific issues during the shoot that can’t be addressed in-camera.
To help you navigate these common challenges, especially those related to shiny and reflective surfaces. We have outlined a few quick yet effective editing techniques below to refine and elevate your final images.
Final Thoughts
Reflective product photography is both a challenge and an opportunity. When handled with the right knowledge, careful lighting, and precise editing, reflective surfaces can elevate a product’s look and create a premium visual impact that attracts buyers. From understanding light behavior to applying refined post-processing, every step plays a vital role in achieving clean, professional results.
If you want flawless, market-ready images without the stress of complex editing, GRASIGNER is here to help. As a professional image editing agency, we specialize in polishing reflective product photos with accuracy, balance, and brand-focused precision. Let GRASIGNER transform your product images into high-converting visuals that stand out, build trust, and drive sales.
Related Posts

How to Write Ecommerce Product Descriptions That Actually Increase Sales
Imagine starting 30 years ago starting a business, adopting strategy,…

The Ultimate Guide to eCommerce Product Photography in 2025
In the booming world of online retail, product photography is…